
That new stain on your ceiling that appeared right after your roof was replaced is not a coincidence. It’s a clear red flag that something went wrong during the installation process. A roofing system is more than just shingles; it’s an interconnected shield of decking, underlayment, and flashing. A failure in any one of these areas can compromise the entire system and lead to visible damage inside your home. This kind of ceiling damage after roof replacement is a direct sign of poor workmanship. Before you can get it fixed, you need to understand the potential causes, from improperly sealed flashing to structural stress. Here’s what you need to know.
Key Takeaways
- A Quality Roofer Is Your Best Insurance: Avoid ceiling issues from the start by choosing a certified, licensed, and insured contractor. Their expertise and use of high-quality materials are the best guarantee against installation-related leaks and damage.
- Document Damage Before You Call: The moment you spot a stain or crack, take clear photos from multiple angles. This visual proof is your most powerful tool when you contact your contractor to report the problem and start the repair process.
- Installation Errors Are the Contractor’s Responsibility: If the ceiling damage is due to poor workmanship, your roofer’s warranty should cover the repairs. A reputable contractor will fix both the leak on the roof and the resulting interior damage at their own expense.
Why Does Ceiling Damage Happen After a New Roof?
It’s incredibly frustrating to invest in a brand-new roof, only to look up and see a water stain or crack spreading across your ceiling. You paid for peace of mind, not a new problem. While this shouldn’t happen after a quality residential roofing installation, it’s a situation some homeowners face. Understanding why it happens is the first step toward getting it fixed correctly.
Most often, ceiling damage after a roof replacement points back to issues with workmanship or unexpected events during the installation process. It’s rarely a coincidence. The problem could stem from something as small as a single misplaced nail or as significant as failing to protect your home from a sudden rainstorm. A new roof is a complex project, and even with the best intentions, mistakes can happen if a crew is inexperienced or cuts corners. From improperly sealed flashing to accidental structural stress, the root cause is almost always tied directly to the work done on your roof. It’s important to remember that your roofing system is more than just shingles; it’s an interconnected system of decking, underlayment, flashing, and ventilation. A failure in any one of these areas can compromise the entire system and lead to visible damage inside your home. Let’s walk through the most common reasons you might be seeing damage downstairs, so you know exactly what to look for.
Flashing Wasn’t Installed Correctly
Think of flashing as the rain gear for the most vulnerable parts of your roof—the areas around chimneys, vents, skylights, and where different roof planes meet. This thin metal material is designed to direct water away from these seams and into the gutters. If the flashing is installed incorrectly, is damaged, or isn’t sealed properly, it creates a direct path for water to sneak under your new shingles. This is one of the most frequent causes of new leaks because it requires skill and attention to detail. An improperly installed flashing is a clear sign of poor workmanship that can lead to an urgent need for emergency roof repair.
The Underlayment is Faulty
Beneath your shingles lies a critical layer of protection called the underlayment. This is your roof’s secondary water barrier, and it’s the last line of defense against moisture reaching the wooden roof deck. If this material was torn, wasn’t overlapped correctly during installation, or if the contractor used a cheap, low-quality product, it won’t do its job. Even a perfect shingle installation can’t always stop wind-driven rain, and that’s when the underlayment is supposed to step in. When it fails, water can seep through, saturate the wood decking, and eventually show up as a stain or bulge on your ceiling below.
Stress from the Installation Process
A roof replacement is a heavy-duty construction job. The process involves workers walking across your roof structure, tearing off old materials, and loading on heavy bundles of new shingles. All this weight and activity can put significant stress on your home’s framework. If the crew isn’t careful, they can accidentally drop a heavy load or step on a weak spot, cracking the roof’s wooden decking or even a support beam. This structural damage might not be obvious at first, but it can easily translate into cracks or sagging in the drywall or plaster of your ceiling.
Weather Exposure During the Job
A professional roofing crew always keeps a close eye on the weather. During the tear-off phase, your home is completely exposed to the elements. If a sudden Central Florida downpour rolls in and the team isn’t prepared, water can pour directly into your attic and home. Reputable contractors have large, heavy-duty tarps on hand to quickly cover the exposed roof and prevent this from happening. A failure to protect your home from rain during the project is a major oversight that can cause immediate and widespread water damage. It highlights the importance of hiring a team that is prepared for unexpected weather, much like you would for a hail damage inspection.
How a Poor Roofing Job Leads to Ceiling Damage
A new roof should give you peace of mind, not a new set of problems. Unfortunately, if the installation is handled poorly, it can directly lead to issues inside your home, starting with your ceiling. Understanding how a subpar roofing job causes this damage is the first step in protecting your investment and holding the right people accountable. From cutting corners to simply not paying attention, a contractor’s mistakes on the roof will eventually show up overhead.
Shingles Are Incorrectly Placed or Sealed
Your roof’s first line of defense is its shingles, but they only work if they’re installed correctly. When shingles are misaligned, improperly fastened, or poorly sealed, they create pathways for water to seep underneath. This moisture can saturate the roof decking and eventually leak into your attic, causing those dreaded brown stains on your ceiling. Beyond leaks, improperly fastened materials can also cause vibrations during windy conditions, which can lead to stress cracks in your ceiling’s drywall or plaster over time. A professional residential roofing installation ensures every shingle is perfectly placed and sealed, creating an impenetrable barrier.
The Installation Was Rushed
Speed is not a sign of quality in the roofing world. A contractor who rushes the job is likely taking shortcuts to save time and money, and your home pays the price. This might mean they didn’t use enough nails, skipped applying sealant in critical areas, or didn’t give materials enough time to set properly. A rushed job can leave your roof vulnerable from day one, often leading to leaks during the very next rainstorm. Quality workmanship requires patience and attention to detail. If a contractor seems more focused on finishing quickly than doing the job right, it’s a major red flag that could lead to you needing roof claim assistance down the road.
Rotten Wood Wasn’t Replaced
Putting new shingles over a rotten foundation is like building a house on sand—it’s destined to fail. Before installing a new roof, a reputable contractor will thoroughly inspect the wooden decking underneath for any signs of rot, softness, or water damage. If this crucial step is skipped, any existing rot will continue to spread, trapping moisture and encouraging mold growth. Eventually, the weakened decking can sag under the weight of the new roof, putting stress on your home’s structure and causing your ceiling to bulge or crack. A thorough hail damage inspection always includes checking the decking for this very reason.
Your Home Wasn’t Protected During Installation
The damage doesn’t always happen after the crew leaves; sometimes, it occurs during the replacement process itself. When the old roof is torn off, your home is temporarily exposed to the elements. A professional team will take great care to protect your property, using tarps to cover the exposed roof deck in case of a sudden Florida downpour. If they fail to do this, even a brief shower can send water pouring into your attic and straight to your ceiling. This oversight can cause immediate and extensive water damage, turning your roof replacement project into an emergency roof repair situation.
What Signs of Ceiling Damage Should I Look For?
After your new roof is installed, it’s a good idea to keep an eye on your ceilings. Spotting potential issues early can save you a lot of headaches and costly repairs down the road. While a professional installation is designed to protect your home for decades, the process itself is intensive, and sometimes, unexpected issues can arise. Knowing what to look for gives you peace of mind and helps you act quickly if something seems off.
It’s easy to assume that once the roofing crew leaves, the job is 100% done. But the first few weeks, and especially the first big rainstorm, are the real test. Don’t wait for a problem to become obvious. A quick, regular check of your ceilings in the rooms directly below the new roof can make all the difference. You don’t need to be an expert to spot the warning signs. Most are quite visible if you know what you’re looking for. From subtle discoloration to more alarming cracks and sags, these indicators tell a story about what’s happening above. Paying attention now ensures your investment in a new roof truly protects your entire home, from the shingles all the way down to the ceiling. Here are the four main signs of ceiling damage that every homeowner should be aware of after a roof replacement.
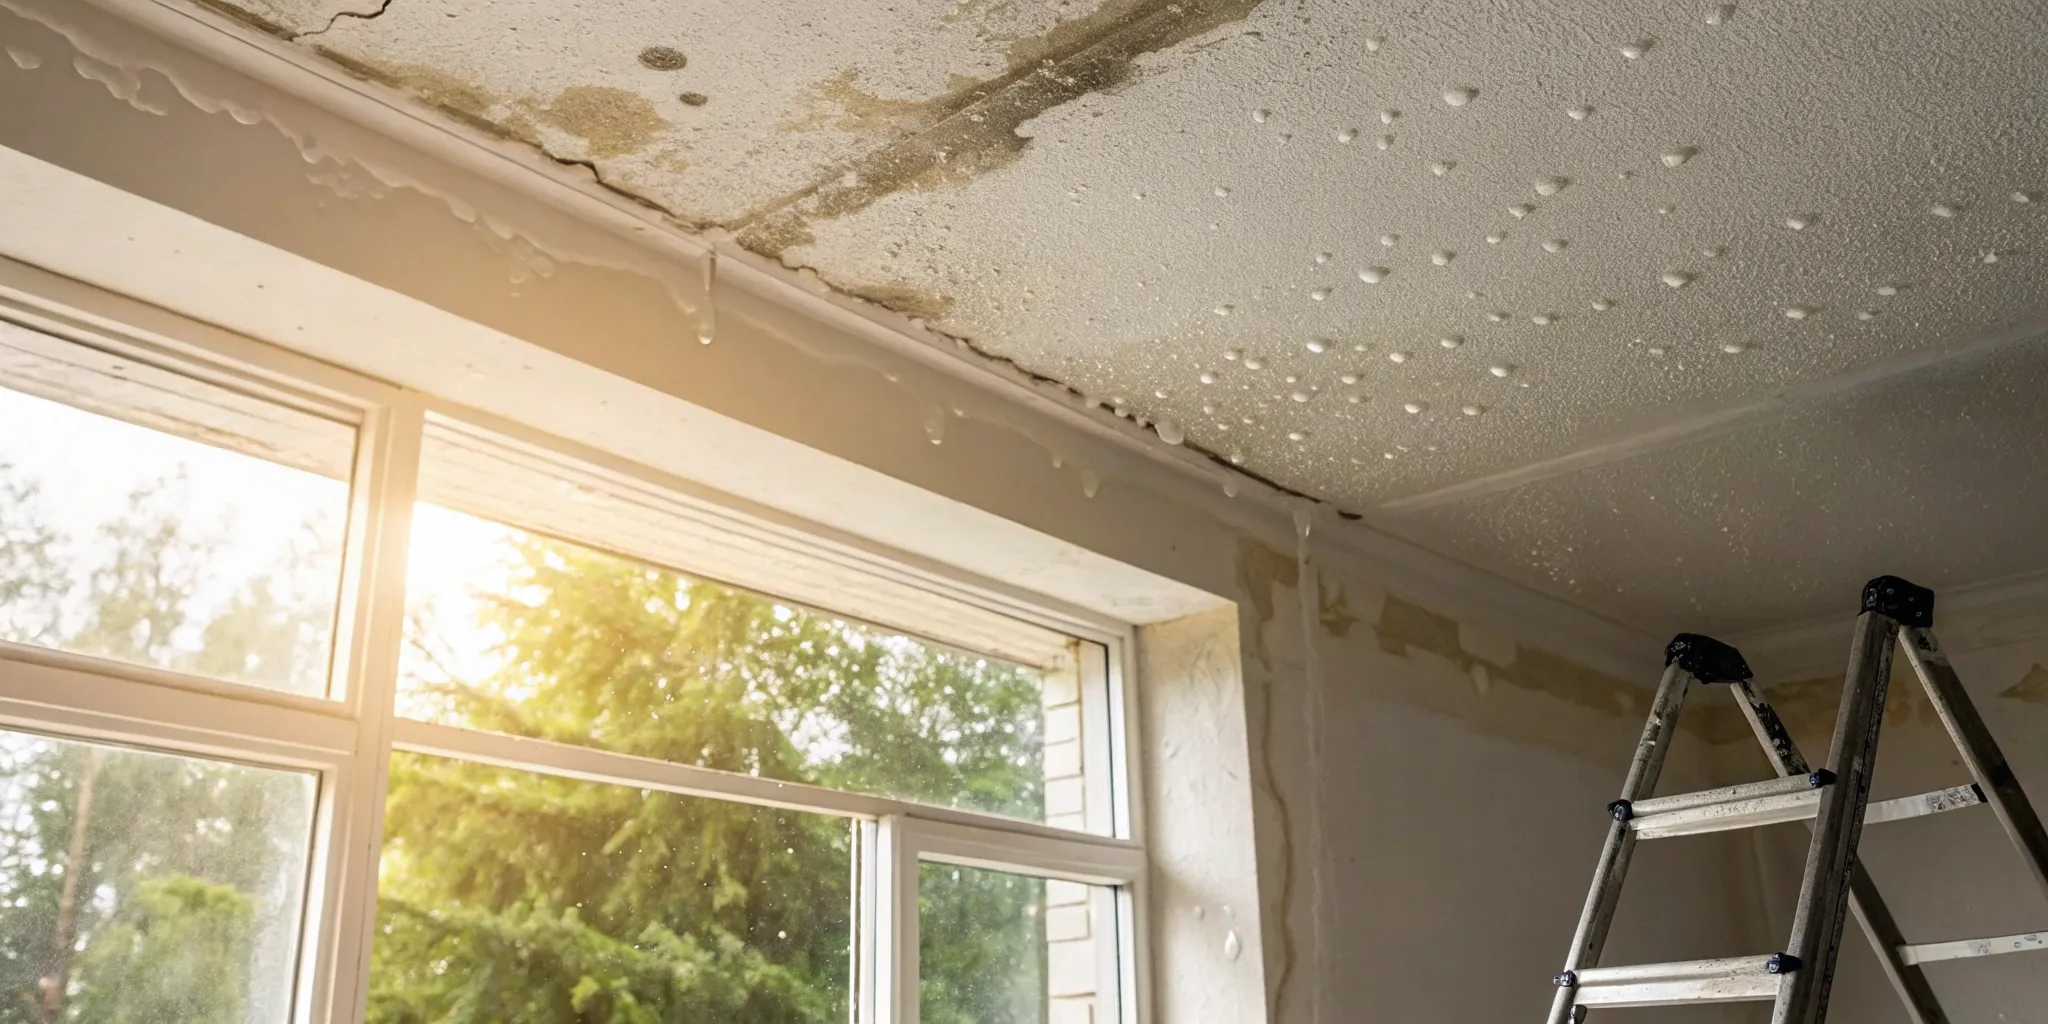
Water Stains and Discoloration
This is often the most obvious sign of a problem. Look for yellowish or brownish patches on your ceiling, which can be small spots or large, map-like stains. Sometimes, water damage occurs when old roofing materials are removed, exposing the interior to moisture before the new roof is fully sealed. If you notice any new discoloration after your residential roofing project is complete, it’s a clear signal that water is getting in somewhere it shouldn’t be. Don’t dismiss it as an old stain; new stains are a direct call to action.
Sagging or Bulging Spots
A ceiling should be flat and smooth. If you notice any areas that are starting to droop, sag, or bulge downwards, it’s a serious red flag. This often means water is pooling and collecting in that spot, weighing down the drywall or plaster. The pressure from workers walking on the roof or the weight of heavy materials during installation can sometimes stress the underlying structure, leading to these weak spots. Don’t ignore a sagging ceiling; it indicates a significant moisture issue that could lead to a collapse if left unaddressed.
Cracks in the Drywall or Plaster
It’s not uncommon to see a few tiny, hairline cracks appear after a roof replacement. The vibrations from hammering and other installation activities can sometimes cause these minor cosmetic issues. However, you should pay close attention to any cracks that are wide, growing, or accompanied by discoloration. While some contractors may consider small cracks a normal part of the process, larger fractures could point to a more significant structural problem or an underlying leak that needs to be addressed. Keep a photo log of any new cracks to track their progress.
Mold Growth or Musty Smells
Where there’s persistent moisture, mold is sure to follow. If you see black, green, or gray spots appearing on your ceiling, you’re likely dealing with mold growth. You might also notice a persistent musty or earthy smell in the room, even if you can’t see any visible mold. Because mold can spread quickly and impact your home’s air quality, it’s crucial to act fast. This is a sign of an active leak that requires emergency roof repair to prevent further damage and protect your family’s health.
What to Do the Moment You Find Ceiling Damage
Discovering a water stain or crack in your ceiling after a brand-new roof installation is incredibly frustrating. Your first reaction might be panic, but taking a deep breath and following a clear plan is the best way forward. Acting quickly and methodically can prevent further damage and ensure the problem is resolved correctly. The moment you spot an issue, your focus should be on documenting the problem, contacting the right people, containing the damage, and getting an expert assessment. By following these steps, you can protect your home and hold your contractor accountable for their work. This process will also give you the necessary evidence if you need to involve your insurance company and seek roof claim assistance. Let’s walk through exactly what you need to do.
Take Photos to Document Everything
Before you move anything or even pick up the phone, grab your smartphone and start taking pictures. This is your most important first step. Clear, detailed photos create a visual record of the damage exactly as you found it. Capture the stains, cracks, or sagging areas from multiple angles and distances. If you can safely access your attic, take photos of the corresponding area on the underside of the roof deck to show where moisture is coming in. This documentation is crucial when you speak with your roofing contractor and can be invaluable if you need to file an insurance claim later. Make sure your photos are well-lit and timestamped if possible.
Call Your Roofing Contractor Immediately
With your photos ready, your very next call should be to the company that installed your roof. Don’t delay. Most roofing contractors offer a workmanship warranty, and you need to notify them of the issue as soon as possible to start that process. When you call, calmly explain what you’ve found and offer to send them the photos you just took. Have the date of your roof installation and any contract details handy. A reputable contractor will want to address the problem quickly to stand by their work and protect their reputation. This initial call sets the expectation that they need to come out and investigate the source of the ceiling damage.
Stop More Water from Getting In
While you wait for your contractor to respond, take immediate steps to minimize any further damage to your home. If water is actively dripping, place buckets or towels underneath to protect your floors and furniture. If the leak is significant and more rain is in the forecast, you may need a temporary fix. A severe leak can quickly escalate, turning a small stain into a major interior repair job. In these situations, you might need an emergency roof repair service to place a tarp over the affected area on your roof. This prevents more water from entering your home until a permanent repair can be made.
Get a Professional Assessment
Your original contractor should come to your home to perform a thorough inspection of the roof and the interior damage. A professional assessment will identify whether the issue stems from faulty installation, defective materials, or another cause. The contractor should explain their findings and propose a clear plan to fix both the roof and the resulting ceiling damage. If you feel their assessment is incomplete or you’re not confident in their proposed solution, don’t hesitate to get a second opinion from another trusted, certified roofing company. An independent expert can provide a detailed report on your roof’s condition and confirm the source of the problem.
Who Is Responsible for Fixing the Ceiling?
Figuring out who pays for ceiling repairs can feel complicated, but it usually comes down to what caused the damage in the first place. Was it a mistake during installation, a faulty product, or something else entirely? Let’s walk through the different scenarios to help you understand who is responsible for making things right.
Your Contractor’s Warranty and Liability
If the ceiling damage is a direct result of poor installation, your roofing contractor should be responsible for the repairs. This falls under their workmanship warranty, which covers the quality of their labor. A reputable contractor stands by their work and will not only fix the leak on the roof but will also cover the cost of repairing the interior damage, like your ceiling. This is a clear sign of a trustworthy company. If you find yourself in this situation, having a contractor who can provide roof claim assistance can make the process much smoother, ensuring all the necessary repairs are handled professionally and without added stress on you.
What Your Insurance Company Covers
Your homeowner’s insurance policy typically comes into play when the damage is caused by something other than faulty workmanship. For example, if a sudden, severe storm hits in the middle of your roof replacement and causes a leak, that’s often considered a covered event. It’s crucial to act fast, as water damage can lead to mold, which grows quickly and can pose health risks. Document the damage thoroughly and contact your insurance agent to start the claims process. For sudden issues that can’t wait, you may need an emergency roof repair to prevent further damage while you sort out the insurance details.
Workmanship vs. Material Warranties: What’s the Difference?
It’s important to understand the two main types of warranties. A workmanship warranty, provided by your contractor, covers the installation itself. If shingles are installed incorrectly, leading to a leak, this warranty applies. A material warranty, provided by the manufacturer, covers defects in the roofing products, like faulty shingles. Many manufacturers offer enhanced warranties only when their products are installed by certified contractors. These certifications are a great indicator that a contractor has the right training to install the materials correctly, ensuring your residential roofing project is protected by the best possible coverage from both the installer and the manufacturer.
When You Are Responsible for Repairs
In some cases, you might be responsible for minor interior touch-ups. The process of tearing off an old roof and installing a new one involves a lot of vibration, which can sometimes cause small, hairline cracks in drywall or plaster ceilings. Many contractors view these minor cosmetic issues as an unavoidable part of the construction process rather than a result of negligence. While a major crack or water damage is clearly the contractor’s responsibility, these tiny stress cracks may not be covered under their warranty. It’s always a good idea to discuss this possibility with your contractor before the project begins to set clear expectations.
How to Prevent Ceiling Damage During a Roof Replacement
The best way to deal with ceiling damage is to prevent it from ever happening. A proactive approach during your roof replacement project is your strongest defense against future leaks, stains, and stress. Choosing the right team and setting clear expectations from the start can make all the difference, ensuring the job is done right the first time and your home stays protected from the top down.
Choose a Qualified and Certified Contractor
Finding a roofer is easy, but finding a truly qualified one takes a little more effort. Look for contractors who hold certifications from roofing manufacturers. These credentials aren’t just fancy badges; they mean the crew has received specific training to install that manufacturer’s products correctly. This is crucial because proper installation is key to your roof’s performance and longevity. A certified contractor can also offer enhanced warranties that you wouldn’t get otherwise, giving you an extra layer of protection. Taking the time to find a certified professional for your residential roofing project is one of the smartest investments you can make in your home.
Verify Your Contractor’s License and Insurance
Before you sign any contracts, always ask for proof of licensing and insurance. A valid contractor’s license shows that the company meets state and local regulations for safety and quality. It’s your assurance that they are a legitimate business held to professional standards. Equally important is their insurance. The contractor should have both general liability insurance to cover any accidental damage to your property and workers’ compensation to cover their crew in case of injury. Without this coverage, you could be held financially responsible for accidents. A reputable company will have no problem providing you with their documentation for your peace of mind.
Insist on High-Quality Materials
The materials used on your roof are just as important as the skill of the people installing them. While it might be tempting to go with a lower bid that uses cheaper shingles or underlayment, this often leads to problems down the road. High-quality materials are designed to withstand Florida’s intense sun, heavy rains, and high winds, ensuring better durability and performance. Ask your contractor what brands they recommend and why. A great roofer will be transparent about the products they use for their commercial roofing projects and explain the benefits of investing in quality materials that will protect your property for years to come.
Plan Ahead with a Pre-Installation Inspection
A thorough inspection before any work begins is a critical step in preventing future issues. This assessment allows the contractor to identify and plan for any underlying problems, like soft or rotten decking that needs to be replaced. Addressing these issues during the roof replacement is far more effective than discovering them after a leak has already caused ceiling damage. This is also the perfect time to discuss the logistics of the project. Ask how the crew will protect your home’s exterior and what precautions they’ll take to minimize vibrations and debris that could affect your ceilings. A detailed hail damage inspection or pre-work check-up sets clear expectations for a smooth project.
Getting Your Contractor to Make Repairs
Discovering ceiling damage after a roof replacement is incredibly frustrating, but there is a clear path to getting it fixed. A reputable contractor stands by their work and will want to make things right. The key is to approach the situation with a clear plan. By understanding your warranty, getting a detailed estimate, and communicating effectively, you can ensure the repairs are handled professionally and efficiently. This process protects your home and holds your contractor accountable for the quality of their installation. Remember, you’ve invested in a new roof to protect your home, and it’s reasonable to expect it to be done correctly.
A professional roofer understands this and will have a system in place to address these kinds of issues. Your goal is to work with them through that system to get the resolution you deserve. It’s not about placing blame; it’s about finding a solution. Following these steps will help you stay in control of the situation and move toward a swift and satisfactory repair. When you have a structured approach, you can turn a stressful discovery into a manageable task. It shows the contractor that you are serious and organized, which often leads to a faster response and a better outcome for everyone involved.
Understand Your Warranty Terms
Before you do anything else, pull out the contract and warranty paperwork from your roof replacement. Most roofing issues that lead to ceiling damage stem from installation errors, which should be covered by your contractor’s workmanship warranty. If a leak happens because of bad installation, the roofing contractor should fix the roof for free. A trustworthy roofer will also often cover the cost of repairing interior damage, like your ceiling. Review the fine print to understand exactly what is covered, the duration of the warranty, and the process for filing a claim. This knowledge is your best tool for ensuring the contractor honors their agreement.
Get a Clear Estimate and Timeline
Once your contractor has assessed the damage, they should provide a detailed, written plan for the repairs. This isn’t the time for a verbal agreement. Ask for a line-by-line estimate that outlines all the work required for both the roof and the ceiling, including materials and labor. This document ensures everyone is on the same page and prevents surprise costs later. Just as importantly, request a clear timeline for when the work will begin and when you can expect it to be completed. Having these details in writing provides a record of the contractor’s commitment and helps you manage your expectations throughout the repair process.
Communicate Effectively During the Repair Process
Clear and consistent communication is essential. When you first notice the damage, take pictures to document everything, then contact your roofing company immediately. A good contractor will be responsive and schedule an inspection to see the problem firsthand. When you speak with them, remain calm and professional. Use your photos to explain the issue clearly. It’s also a good idea to keep a log of all your communications, including dates, times, and a summary of what was discussed. This creates a paper trail that can be useful if any disputes arise. A professional company will appreciate your thoroughness and work with you to resolve the problem quickly.
When Should You Call Your Insurance Company?
Figuring out who to call first—your roofer or your insurance company—can feel confusing, but there’s a strategic way to approach it. While you absolutely need to notify your insurance provider, I always recommend getting a professional opinion on the damage first. When you call your insurance company armed with a detailed report from a trusted roofing contractor, you’re no longer just reporting a problem; you’re presenting a documented case. This simple step gives you more control over the conversation and helps streamline the entire process.
Having an expert assessment clarifies the extent of the damage and its likely cause, which is exactly the information your insurer will need. It prepares you to answer their questions confidently and ensures you have the evidence to back up your claim. If the process feels overwhelming, remember that you don’t have to go it alone. Many roofing companies offer roof claim assistance to help you manage the paperwork and communication, making sure nothing gets missed.
How to File a Claim for Ceiling Damage
Once you have a professional assessment in hand, it’s time to contact your insurance company. Start by gathering all your documents: the photos you took of the damage, the report from your roofing contractor, and your original roof replacement contract. When you call your agent, have your policy number ready and be prepared to explain the situation clearly. Let them know you’ve had a recent roof replacement and are now seeing interior ceiling damage. They will guide you through the official steps to file a claim, and having your roofer’s report will make this part much smoother.
Working with an Adjuster and Providing Documentation
After you file a claim, your insurance company will send an adjuster to inspect the damage. It’s a great idea to be home for this appointment, and even better if your roofing contractor can be there with you. Your roofer can speak the same technical language as the adjuster and point out specific details that might otherwise be overlooked. Provide the adjuster with copies of all your documentation, including photos and the professional assessment. They can also advise you on immediate steps to prevent further damage, like making temporary repairs that are often covered by your policy.
Understand Your Policy’s Coverage Limits
Before you get too far into the claims process, take some time to review your homeowner’s insurance policy. Coverage for ceiling damage caused by a faulty roof installation can be a gray area. Some policies cover this type of “consequential damage,” while others might exclude issues related to workmanship. If you’re unsure whether your policy covers the damage, calling your insurance company to ask clarifying questions is a good first step. Understanding your coverage limits will help you set realistic expectations and determine whether you need to lean on your contractor’s liability insurance to cover the repairs.
How to Protect Your Home After Repairs Are Done
Once the dust has settled and your ceiling and roof are back in pristine condition, your work isn’t quite done. Staying proactive is the best way to prevent future issues and protect your investment. A little bit of maintenance goes a long way in keeping your home safe, dry, and structurally sound for years to come. Think of it as simple, preventative care for one of your home’s most important assets. By keeping an eye on things and knowing what to look for, you can catch small problems before they turn into costly headaches.
Schedule Regular Roof and Ceiling Inspections
Your roof and ceiling should get a check-up every so often, just like anything else important. A great habit is to visually inspect them twice a year—once in the spring and once in the fall—and always after a major storm passes through. Look for any new stains, cracks, or changes on your ceiling. On the roof, check for missing or damaged shingles. For a more thorough check, a professional hail damage inspection can identify subtle issues that aren’t visible from the ground. A properly installed roof should protect your home without causing trouble, but if you spot any new damage, it’s crucial to act fast to find the cause and prevent it from worsening.
Maintain Proper Attic Ventilation
Your attic needs to breathe. Proper ventilation allows excess heat and moisture to escape, which is essential for the health of your entire roofing system. If your attic doesn’t have good airflow, moisture can get trapped and lead to mold, mildew, or even new stains on your freshly repaired ceiling. Take a peek in your attic every now and then to make sure your vents aren’t blocked by insulation or stored items. If you suspect the ventilation system was disturbed during the roof replacement, it’s best to have a professional take a look. Ensuring good airflow protects the structural integrity of your roof and keeps your home healthier.
Know the Early Warning Signs to Watch For
Knowing what trouble looks like is your best defense. Keep an eye out for any signs that your roof isn’t performing as it should. From the outside, look for shingles that appear lifted, bumpy, or wavy, as this can indicate sloppy work or failing materials. Inside, be alert for the classic signs of ceiling damage: new water stains, sagging or bulging spots, cracks in the drywall, or a persistent musty smell. Catching these issues early can make the difference between a simple fix and a major repair. If you see something that concerns you, don’t wait for it to get worse—a quick response can prevent the need for emergency roof repair.
Related Articles
- Wind Damage to Roof Insurance Coverage Explained
- Cost to Fix a Roof Leak: The 2025 Price Guide
- Average Cost of Roof Replacement: What to Expect
- Storm Damage Roof Inspection: A Complete Guide
- Wind Damage Roof Repair: A Step-by-Step Guide
Frequently Asked Questions
What’s the very first thing I should do if I see a water stain on my ceiling after a new roof? Before you do anything else, grab your phone and take clear photos of the damage from several angles. This documentation is your most important tool. Once you have a record, call the company that installed your roof immediately to inform them of the issue. While you wait for their response, place a bucket or towels under any active drips to protect your floors and furniture from further harm.
Is my roofing contractor automatically responsible for fixing the ceiling damage? If the damage is a direct result of poor installation—like improperly sealed flashing or a mistake made during the job—then yes, their workmanship warranty should cover the cost of repairing both the roof leak and the resulting ceiling damage. A reputable contractor will stand by their work. However, if the damage was caused by a severe storm that occurred during the installation, it might be a situation for your homeowner’s insurance instead.
How can I tell if a ceiling crack is serious or just a normal part of the installation process? It’s true that the vibrations from a roof replacement can sometimes cause tiny, hairline cracks in your ceiling’s plaster or drywall. These are usually just cosmetic. You should be concerned if you see cracks that are wide, getting longer, or have any brownish or yellowish discoloration around them. Those are signs of a potential structural issue or an active leak that needs immediate attention from your contractor.
Should I call my roofer or my insurance company first? I always recommend calling your roofing contractor first. Having them come out to assess the problem gives you a professional opinion on what caused the leak. When you eventually call your insurance company, you’ll be armed with an expert report, which gives you more control over the conversation and helps streamline the claims process. Your roofer can identify if it’s a workmanship issue they need to fix or damage you need to file a claim for.
What’s the most important thing I can do to avoid this problem with my next roof replacement? The single most effective step you can take is to thoroughly vet your contractor before you hire them. Don’t just go with the lowest bid. Instead, choose a licensed and insured company that holds certifications from roofing manufacturers. These certifications prove they have been properly trained to install the materials correctly, which significantly reduces the risk of installation errors and protects your warranty.