

When a hurricane finally moves on, the silence it leaves behind can be just as unsettling as the storm itself. In that quiet, your mind starts racing, and one of the first worries is always the roof. As your home’s main line of defense, it took the worst of the wind and rain. Now, the big question is, what’s next? Taking a deep breath and following a clear plan is the best way to regain a sense of control. This guide is designed to walk you through the essential steps, from safely assessing the damage to navigating the process of a roof repair after hurricane, ensuring you can protect your home and get back to normal as quickly as possible.
Key Takeaways
- Act Safely and Document Everything: After a storm, your first steps are to inspect for damage from the ground and take detailed photos of any issues. This evidence is essential for your insurance claim and helps you assess the situation without risking injury.
- Hire a Reputable Local Roofer: A licensed and insured local contractor is your best resource for a thorough inspection and quality repairs. They can identify hidden damage, provide an accurate estimate, and help you avoid common post-storm scams.
- Focus on Proactive Maintenance: The best way to handle a hurricane is to be prepared for it. Scheduling annual inspections and choosing storm-resistant materials for a roof replacement can significantly reduce the risk of major damage in the future.
What Are the Signs of Hurricane Roof Damage?
After a hurricane passes, checking your roof is a critical first step. As your home’s primary shield, it takes the brunt of the storm, but damage isn’t always obvious. Subtle issues caused by high winds and heavy rain can lead to major problems if ignored. Knowing what to look for, both outside and inside, is key to preventing costly repairs. Here are the main signs of hurricane roof damage.
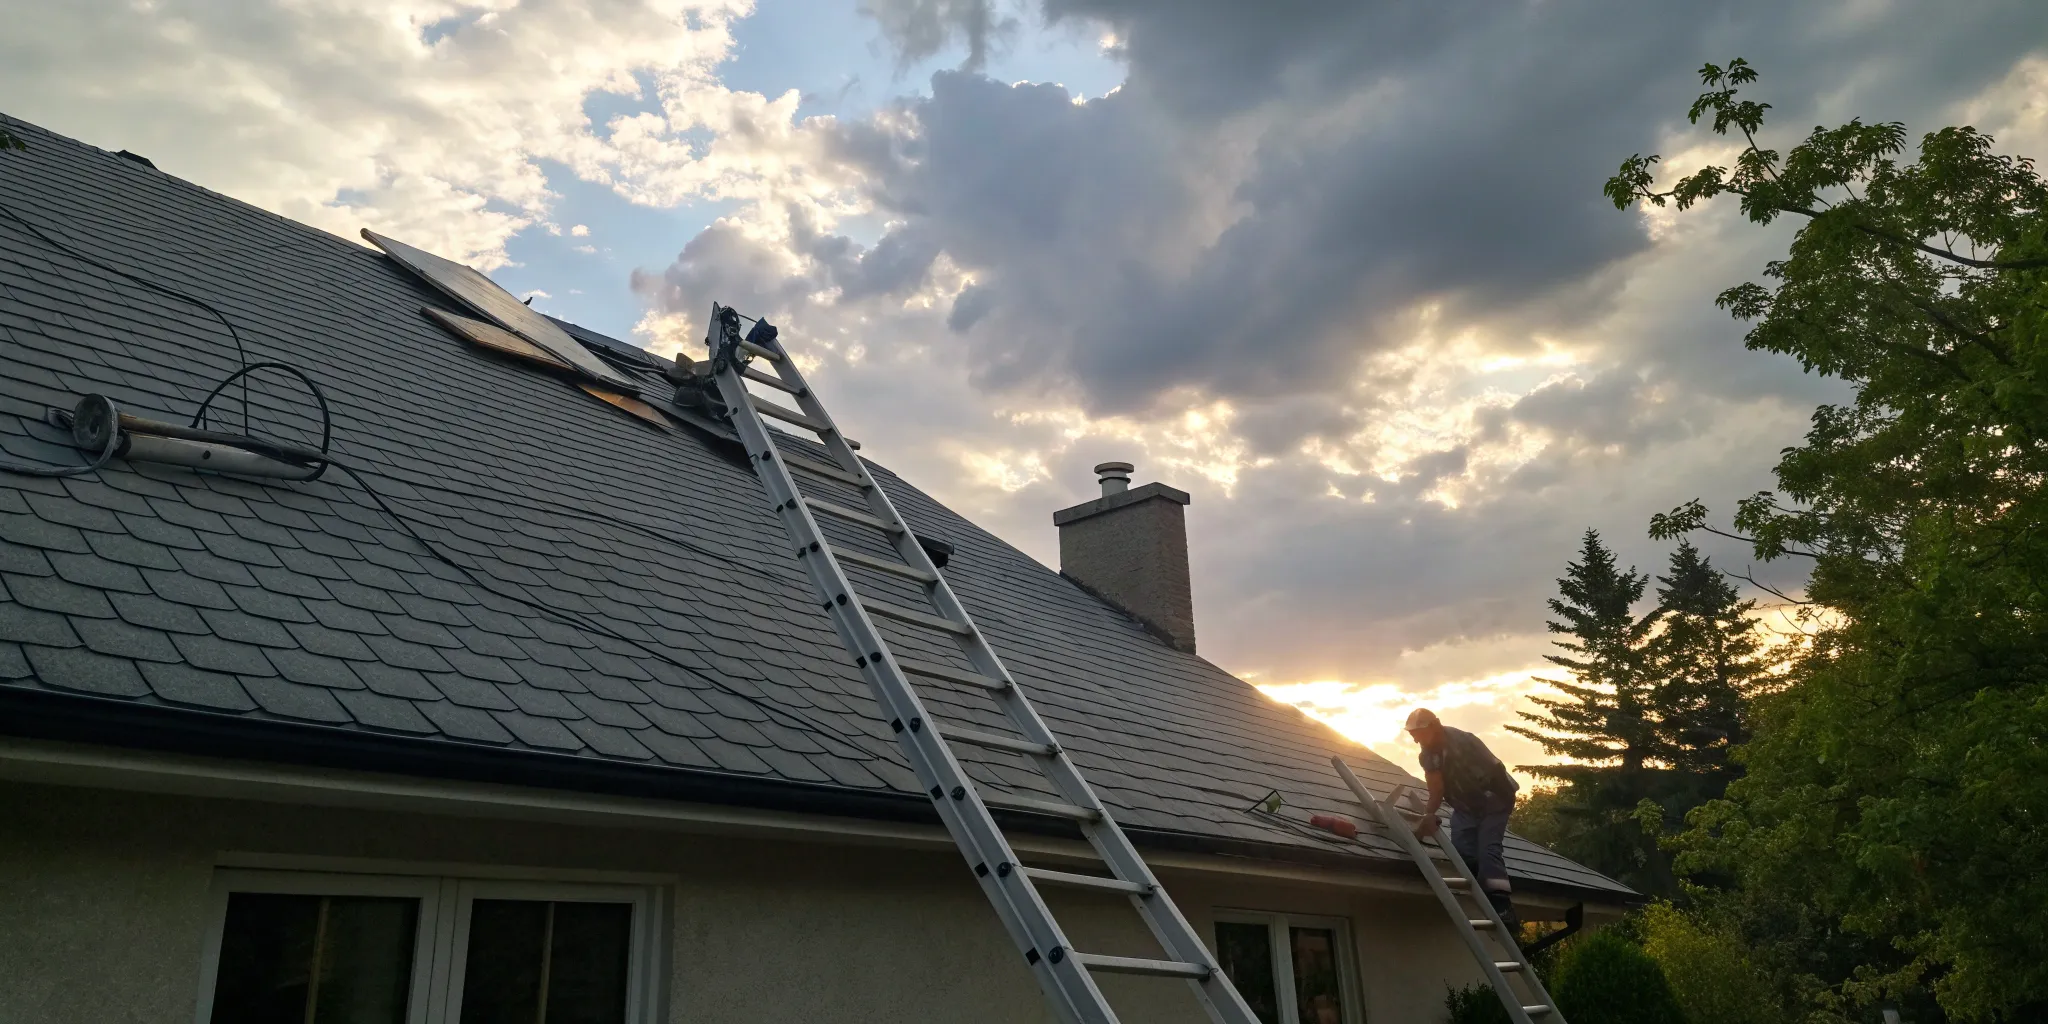
Spotting Damage from the Outside
The most visible signs of damage will be on the exterior. From the safety of the ground, look for shingles that are missing, cracked, or curled at the edges. Hurricane-force winds can easily lift shingles and break their watertight seal. Also, check your gutters, vents, and the flashing around your chimney for dents or cracks. If your area had hail, you might see dings on your shingles. A key sign of hail damage is the loss of the small, sand-like granules that cover them. Without these granules, your roof is left vulnerable to sun and rain.
Looking for Warning Signs Inside
Some of the most serious roof damage is hidden from the outside. Your post-storm inspection must include a look inside your attic. With a flashlight, carefully check the underside of your roof deck for moisture, dark water spots, or active leaks. Water can sneak in through tiny cracks you’d never see from the ground. Inside your living spaces, look up at the ceilings. Water stains or bubbling paint are clear red flags that water is getting in. Acting fast on these signs is crucial to prevent mold and further issues, often requiring an emergency roof repair.
Recognizing Structural Problems
While missing shingles and leaks are common, hurricanes can cause deeper, structural problems. Intense winds put massive stress on your roof’s framework, potentially causing it to sag or warp. If your roofline looks uneven from the street, it’s a sign of a serious issue that needs immediate professional attention. Even if your roof looks fine, hidden damage can compromise its integrity. If you suspect significant damage, you may be looking at a full replacement. Addressing these major residential roofing issues promptly is crucial for keeping your home safe.
How to Safely Assess Your Roof
After a hurricane passes, your first instinct might be to climb up and see what happened to your roof. Please resist that urge. Your safety is the top priority, and a storm-damaged roof can be incredibly dangerous. A thorough assessment doesn’t require you to become a daredevil—it just requires a smart, step-by-step approach that starts with your feet planted firmly on the ground.
The goal is to get a clear picture of the situation without putting yourself at risk. By following a few simple guidelines, you can gather the initial information you need to protect your home and prepare for the next steps, whether that’s making a temporary fix or calling in a professional for a detailed inspection. Let’s walk through how to assess your roof safely.
Inspect from the Ground First
Your initial inspection should always start from the ground. Grab a pair of binoculars if you have them and take a slow walk around the entire perimeter of your property. Look for any obvious signs of trouble. Are there shingles on the lawn? Do you see any that are dented, torn, curled, or completely missing from the roof? Pay close attention to the areas around your chimney, vents, and skylights, as these are common weak points. Also, check your gutters and downspouts for damage or an unusual amount of shingle granules, which can indicate significant wear. This ground-level check gives you a solid starting point without taking any risks.
Put Safety First: Gear and Precautions
We can’t say this enough: stay off the roof. A roof that has just weathered a hurricane can be slippery from rain and may have hidden structural damage, making it unstable and extremely hazardous to walk on. Even if you feel confident, a single misstep could lead to a serious injury. Professional roofers have the training, experience, and specialized safety equipment to handle these inspections correctly. As roofing material manufacturer Owens Corning advises, it’s always best to contact a professional roofing contractor. They know how to perform an inspection safely and can often do so for free, giving you peace of mind without the personal risk.
Know When to Call a Professional
While a ground inspection is a great first step, it won’t reveal the full extent of the damage. Some issues, like hairline cracks, loosened flashing, or subtle hail impacts, are nearly impossible to spot from a distance. This is why getting a professional inspection is so important for identifying all the damage and ensuring you get the right repairs. An expert can safely get on your roof to check for these less obvious problems. A detailed report from a qualified roofer is also essential when you need roof claim assistance. It provides the credible documentation your insurance company will require to process your claim accurately and fairly.
What to Do Immediately After Finding Damage
Discovering your roof is damaged after a hurricane can feel overwhelming, but taking a few key steps right away can make a huge difference. Your immediate goals are to prevent the problem from getting worse, document the damage for your insurance company, and get temporary fixes in place safely. Acting quickly and methodically will protect your home and set you up for a smoother repair process. Remember, your safety is the top priority, so never attempt anything that feels risky.
Take Steps to Prevent Further Damage
Once the storm has passed and it’s safe to be outside, your first task is to stop any more damage from happening. If you have active leaks, the most immediate solution is to cover the damaged area with a tarp. This simple step can prevent water from seeping into your home’s structure, insulation, and drywall, saving you from much bigger headaches later. Think of it as first aid for your roof. These are temporary measures, not permanent solutions. For significant issues that require immediate attention, it’s best to call for emergency roof repair to get a professional on-site as soon as possible.
Document Everything for Insurance
Before you move anything or make any temporary repairs, grab your phone and start documenting. Take clear photos and videos of all the damage from as many angles as you can, both inside and outside your home. Capture images of missing shingles, dents from hail, fallen tree limbs, and any water stains on your ceilings or walls. Make detailed notes about what you see, including the date and time you found the damage. This evidence is absolutely essential for your insurance claim. Having thorough documentation makes the process much easier and can help ensure you get the coverage you’re entitled to. We offer roof claim assistance to help you manage this process.
Make Safe, Temporary Repairs
While you wait for a professional, you might be able to handle some minor, temporary fixes yourself, but only if you can do so safely. Never climb onto a wet or structurally compromised roof. If you can safely cover a small hole or secure a loose piece of flashing from a stable ladder, that’s great. However, it’s crucial to recognize that some damage isn’t visible to the untrained eye. That’s why it’s always a good idea to schedule a professional hail damage inspection or a general storm damage assessment. A trained roofer can spot hidden problems that could lead to major issues down the road, ensuring your roof is truly secure.
How to File Your Insurance Claim
Dealing with insurance after a storm can feel like a huge task, but you don’t have to go it alone. The key is to be organized and methodical. By gathering the right documents, knowing how to work with your insurance adjuster, and understanding your policy, you can make the process much smoother. Think of it as building a case for your home—the more prepared you are, the better the outcome will be.
Many homeowners find it helpful to have a trusted roofing expert on their side. A professional can provide detailed damage reports and even help you communicate with your insurance company. Having an advocate who speaks the language of both roofing and insurance can make a world of difference. If you feel overwhelmed, consider getting roof claim assistance to ensure you get a fair assessment and the compensation you deserve for your repairs. This support can be invaluable, turning a stressful situation into a manageable one and helping you get your home back to normal as quickly as possible.
Prepare Your Claim Documentation
Before you even call your insurance agent, your first step is to gather as much evidence as possible. Start by taking clear photos and videos of all the damage, both inside and outside your home. Capture wide shots of the entire roof and close-ups of specific problem areas like missing shingles, dents from debris, or water stains on your ceiling. It’s also a great idea to get a professional hail damage inspection, as an expert can spot issues that aren’t visible from the ground. This professional report, combined with your photos and detailed notes, will create a comprehensive record that strengthens your claim and shows the full extent of the damage.
Work with Your Insurance Adjuster
Once you file your claim, your insurance company will send an adjuster to assess the damage in person. It’s a good idea to have your trusted roofing contractor present for this meeting. Your roofer can point out specific damages the adjuster might overlook and ensure the assessment is thorough and accurate. After the inspection, the adjuster will determine if your claim is approved. Be wary of any contractors who show up unannounced after a storm offering deals that sound too good to be true. Always work with a reputable, local company for your residential roofing needs to avoid scams and ensure quality workmanship.
Understand Your Policy Coverage
Your homeowner’s policy is the ultimate guide to what will be covered. Most policies cover damage from sudden events like hurricanes, but the details matter. One key factor is your roof’s age. Insurance companies often “depreciate” the value of an older roof, meaning they might pay for its current value rather than the full replacement cost. If your roof is nearing the end of its lifespan, your coverage could be limited. Reading through your policy will help you understand these specifics and set realistic expectations. If the out-of-pocket costs are a concern, many roofing companies offer convenient financing options to help manage the expense.
How to Hire the Right Roofing Contractor
After a hurricane, your priority is getting your home back to normal, and a huge part of that is finding a reliable roofer. This isn’t a decision to rush. The contractor you choose will be responsible for protecting your home and family, so it’s worth taking the time to find someone you can trust. A great roofing contractor will not only do quality work but also guide you through the process, from the initial inspection to working with your insurance company. The right partner can make a stressful situation much more manageable.
Choosing a local, reputable company means you’re hiring a team that understands Central Florida’s weather and building codes. They have a reputation to maintain and will be around long after the work is done to stand by their warranty. Look for a contractor who is transparent, communicative, and has a proven track record of helping homeowners recover from storm damage. Taking these extra steps to vet your options will give you peace of mind that your roof is in good hands.
Check for Qualifications and Credentials
Before you let anyone on your roof, make sure they are properly qualified. The most important thing to verify is that they are licensed and insured in the state of Florida. This is non-negotiable. Proper insurance protects you from any liability if a worker is injured on your property. A professional contractor will have no problem providing you with proof of their credentials.
You should also look for a company with a solid local presence and positive reviews. An established local roofer has a vested interest in doing quality work for their community. Ask about their warranties, too. A reputable company will offer a strong warranty that covers both the materials they use and the quality of their workmanship, ensuring your residential roofing investment is protected for years to come.
Get Clear Estimates and Warranties
A trustworthy contractor will always provide a detailed, written estimate before any work begins. This document shouldn’t just be a single number; it should break down the costs for materials, labor, permits, and any other expenses. This transparency is key to avoiding surprise charges down the road. It’s a good idea to get a few different quotes, but remember that the lowest bid isn’t always the best value. Compare the scope of work, materials proposed, and the contractor’s credentials.
Make sure the warranty is also clearly explained in writing. Understand what it covers and for how long. A clear contract and estimate are signs of a professional who is confident in their work. This documentation is also critical when you’re working through your insurance claim, as it provides the clear cost basis your insurer needs.
Watch Out for Post-Storm Scams
Unfortunately, major storms can attract opportunistic, out-of-state contractors known as “storm chasers.” These individuals often travel to disaster areas, knock on doors, and use high-pressure tactics to get you to sign a contract quickly. Be wary of anyone who asks for a large cash deposit upfront, offers a deal that seems too good to be true, or can’t provide a local address and references.
To protect yourself, stick with local, established companies. Check online reviews and ask for references from recent jobs in your area. A legitimate contractor will be patient and professional, giving you the time and information you need to make a confident decision. If you feel pressured or uneasy, it’s best to walk away. A trusted partner can even provide roof claim assistance to help you deal with your insurance company honestly.
What Determines Your Repair Cost and Timeline?
After a hurricane, two of the biggest questions on your mind are likely, “How much will this cost?” and “How long will it take?” The honest answer is: it depends. Several key factors come together to shape your final bill and the project schedule. The extent of the damage, the materials needed for the repair, local labor rates, and your insurance coverage all play a significant role. Understanding these elements will help you set realistic expectations as you begin the recovery process. A trustworthy contractor will walk you through a detailed estimate, explaining how each of these components contributes to the total cost and timeline for your specific situation.
How Damage and Materials Impact Cost
The single biggest factor driving your repair cost is the severity and scope of the damage. A few missing shingles will be a much quicker and less expensive fix than widespread structural issues. For perspective, minor repairs might cost between $300 and $1,000, while major damage could run from $2,000 to over $10,000. The type of residential roofing materials on your home also matters. Asphalt shingles are generally the most affordable to repair or replace, while materials like metal, slate, or tile have higher material and installation costs. The complexity of your roof’s design, such as a steep pitch or multiple gables, can also increase the cost because it requires more time and safety precautions.
Factoring in Labor and Permits
Labor is another significant portion of your roofing bill. Professional roofers’ rates can vary, but you can generally expect to pay between $50 and $200 per hour for skilled work. This cost covers the expertise, insurance, and equipment needed to do the job safely and correctly. Beyond labor, you’ll also need to account for municipal permits. Most substantial roof repairs and all replacements require a permit to ensure the work meets local building codes. While this adds a fee and some processing time to the project, a reputable contractor will handle the entire permitting process for you, making sure everything is done by the book and your roof is up to current safety standards.
How Insurance Affects Your Out-of-Pocket Expense
Your homeowner’s insurance policy is the final piece of the financial puzzle. Most policies cover roof damage from sudden events like hurricanes, which are often referred to as a “covered peril.” However, the amount you pay out-of-pocket depends on your deductible. It’s also important to know that insurance providers often factor in your roof’s age. They may depreciate its value, meaning they’ll pay out less for an older roof than a newer one. This is why clear documentation and a professional inspection are so important. Working with a team experienced in roof claim assistance can help you present a thorough and accurate claim to your provider, ensuring you get the coverage you’re entitled to.
How to Prepare Your Roof for the Next Storm
After you’ve dealt with the aftermath of one storm, the last thing you want is to go through it all again. Taking a proactive approach to your roof’s health is the best way to protect your home and family from future weather events. A little preparation now can make a huge difference when the next storm rolls in. It’s about shifting from a reactive mindset to a preventative one, giving you peace of mind no matter what the forecast says. By focusing on routine care and quality materials, you can strengthen your roof’s ability to withstand Florida’s challenging weather, ensuring it remains a reliable shield for your property.
Stick to a Regular Maintenance Schedule
Think of your roof like your car—it needs regular check-ups to perform its best. Scheduling a professional roof inspection at least once a year is one of the smartest things you can do as a homeowner in Florida. These routine checks allow an expert to spot subtle issues, like a few loose shingles or minor weak spots in the flashing, before a hurricane turns them into major leaks. A trained eye can identify potential problems that are easy to miss from the ground. Staying on top of maintenance helps keep your roof strong and ready for whatever the weather brings. It’s a simple step that can save you from costly emergency roof repairs down the line.
Invest in Storm-Resistant Materials
When it’s time for a roof replacement, think of it as an opportunity to upgrade your home’s defenses. Investing in strong, storm-resistant materials can greatly improve your roof’s ability to handle future storms. For example, impact-resistant shingles are designed to withstand high winds and flying debris much better than standard options. Choosing the right materials for your residential roofing project is a long-term investment in your property’s safety. As a bonus, some insurance companies even offer discounts for homes with certified storm-resistant roofing, which can help offset the initial cost. It’s a practical upgrade that adds both protection and value to your home.
Related Articles
- Storm Damage Roof Inspection: A Complete Guide
- Hire Storm Damage Repair Contractors With Confidence
- Hail Damage Roof Insurance Claim: A Complete Guide
- Wind Damage Roof Repair: A Step-by-Step Guide
- Wind Damage to Roof Insurance Coverage Explained
Frequently Asked Questions
My roof looks okay from the ground. Does that mean it’s fine? Not necessarily. While a ground-level check is a great starting point, some of the most common types of hurricane damage are nearly invisible from a distance. High winds can lift shingles and break their watertight seals without tearing them off completely, leaving your roof vulnerable to leaks. A professional inspection is the only way to spot these subtle issues and ensure there isn’t hidden damage that could cause major problems later on.
Is it safe for me to climb on my roof to check for damage myself? Absolutely not. We can’t stress this enough—please stay off your roof. After a storm, a roof can be slippery and may have sustained structural damage that makes it unstable. Professional roofers have the specialized safety equipment and training to perform an inspection without risk. Your safety is the top priority, and it’s a job best left to the experts.
What’s the most important thing to do right after I spot damage? Before you do anything else, document everything. Use your phone to take plenty of clear photos and videos of the damage from multiple angles, both outside and inside your home. This evidence is crucial for your insurance claim. Once you have your photos, your next step is to prevent the problem from getting worse, which usually means covering the damaged area with a tarp to keep water out until a professional can arrive.
Will my insurance automatically cover a full roof replacement after a hurricane? Coverage really depends on your specific policy and the age of your roof. While most policies cover storm damage, they may not pay for the full replacement cost if your roof is older. Insurance companies often factor in depreciation, meaning they pay based on the roof’s current value, not what it costs to buy a new one. A thorough, professional damage assessment is key to providing your insurer with the proof needed to process your claim fairly.
How can I tell a reputable roofing contractor from a “storm chaser”? A reputable contractor will be a licensed and insured local company with a permanent business address and a solid track record in your community. They will provide a detailed written estimate and will never pressure you to sign a contract on the spot. Be cautious of anyone who shows up unannounced, asks for a large cash payment upfront, or offers a deal that sounds too good to be true—these are common red flags for storm chasers.