

A TPO roof is an excellent choice for Florida properties, offering incredible durability and energy efficiency. But the truth is, the material is only as good as its installation. The difference between a roof that lasts a decade and one that lasts for thirty years comes down to the details of the process. You can get a glimpse of the action in a TPO roofing installation video, but this guide takes you deeper. We’ll explore every critical phase, from selecting the right membrane and fasteners to sealing every penetration against our heavy rains. Consider this your behind-the-scenes look at what it takes to build a truly resilient roof.
Key Takeaways
- TPO is built for the Florida climate: Its reflective surface is a game-changer for lowering energy bills, while its durable material is engineered to withstand intense sun, storms, and potential hail damage.
- A perfect installation is all about the prep and the seams: The success of your roof hinges on a clean, solid deck and perfectly heat-welded seams. This process fuses the membrane into a single, watertight sheet that eliminates weak points.
- Details determine durability: From using the correct fastening pattern to resist wind uplift to meticulously sealing every pipe and vent, every small step is critical. A final, professional quality check ensures these vulnerable areas are completely secure.
What is TPO Roofing and Why Is It a Smart Choice?
If you’re looking for a modern, reliable roofing solution, especially for a flat or low-slope roof, you’ve likely come across the term TPO. TPO, which stands for Thermoplastic Polyolefin, is a single-ply roofing membrane that has become a go-to choice for property owners. It’s engineered to combine the best qualities of other popular materials into one high-performance sheet, offering a fantastic blend of durability, energy efficiency, and affordability.
Think of it as a protective shield for your building. It’s installed in wide, lightweight rolls that are either mechanically fastened or fully adhered to the roof deck. The seams are then heat-welded together to create a single, continuous membrane that is incredibly resistant to leaks. This seamless finish is one of the reasons it’s a top performer. While it’s a favorite for commercial roofing projects, its benefits make it an excellent option for certain residential applications, too. For anyone managing a property in Central Florida, TPO roofing presents a smart, long-term investment that addresses our unique climate challenges head-on.
Save on Energy Bills
One of the most significant advantages of TPO roofing, especially here in sunny Florida, is its incredible energy efficiency. Most TPO membranes are white or light-colored, which makes them highly reflective. Instead of absorbing the sun’s intense heat, a TPO roof reflects it away from your building. This simple feature can make a huge difference in your property’s internal temperature.
By keeping the building cooler, your air conditioning system doesn’t have to work nearly as hard to maintain a comfortable environment. Over time, this translates directly into lower energy consumption and, more importantly, reduced cooling costs on your monthly utility bills. It’s a practical choice that not only protects your property but also helps your budget.
Stand Up to Florida Weather
Florida weather is no joke, and your roof takes the brunt of it. TPO roofing is specifically engineered to be tough and resilient. It’s known for its strong resistance to tears, punctures, and impacts, which is crucial when you consider the potential for flying debris during a storm or even routine hail damage.
Beyond its strength, TPO is also formulated to withstand constant exposure to harsh UV rays without degrading or becoming brittle. Its flexibility allows it to expand and contract with our state’s dramatic temperature fluctuations, preventing cracks from forming over time. This combination of features means you get a long-lasting roof that holds up beautifully against the elements, giving you peace of mind year after year.
Get More for Your Money
When you’re investing in a new roof, you want a solution that delivers great value without compromising on quality. TPO roofing hits that sweet spot perfectly. It’s widely considered one of the most cost-effective materials for flat and low-slope roofs. The installation process is typically faster and more straightforward than other systems, which can help lower labor costs right from the start.
But the value doesn’t stop there. Thanks to its durability and low maintenance requirements, a TPO roof offers an impressive long-term return on your investment. You’ll spend less on repairs and enjoy a longer service life, all while benefiting from lower energy bills. It’s a financially sound decision that’s made even more accessible with flexible financing options.
Gather Your TPO Installation Tools and Materials
Before you even think about unrolling that first sheet of TPO, let’s talk about prep. A successful roofing project is all about having the right tools and materials on hand from the very beginning. It’s like cooking a great meal—you wouldn’t start without all your ingredients measured and ready, right? Getting everything organized first saves you from last-minute scrambles and helps ensure the job is done correctly and safely. For large-scale projects, especially in commercial roofing, having a precise inventory is absolutely critical. A missing box of fasteners or the wrong type of adhesive can bring the entire job to a halt, costing time and money. Taking the time to create a detailed checklist and double-checking your supplies before you start is one of the most important steps you can take. This isn’t just about efficiency; it’s about quality. Using the exact materials specified by the manufacturer ensures your roof performs as expected and keeps your warranty intact. Think of it as setting the foundation for a roof that will protect your property for decades. Below, we’ll walk through the key items you’ll need to gather for your TPO installation, from the membrane itself to the safety gear that keeps everyone protected.
Choose the Right TPO Membrane
The TPO membrane is the star of the show. This single-ply roofing material is what will protect your property from the elements. TPO membranes come in different thicknesses, measured in “mils” (one-thousandth of an inch). You’ll typically see options like 45, 60, and 80 mil. So, which one is right for you? A thicker membrane, like an 80 mil, generally offers greater durability and puncture resistance, making it a great choice for roofs that might experience foot traffic or are in areas prone to hail. For many standard residential roofing applications in Florida, a 60 mil membrane provides a fantastic balance of performance and value, standing up well to the sun and storms without breaking the bank.
Find the Right Fasteners, Adhesives, and Welders
How you attach the TPO membrane is just as important as the membrane itself. There are two primary methods: mechanical attachment, where screws and plates hold the membrane to the roof deck, and full adhesion, where the membrane is glued down. The right method depends on your roof’s structure. You’ll need specific fasteners and plates designed for TPO systems to prevent pull-through during high winds. If you’re using an adhesive, it must be a compatible bonding agent that can withstand Florida’s heat and humidity. Finally, the seams between TPO sheets are fused with a hot-air welder, creating a single, monolithic sheet. This step requires a specialized tool and a lot of skill to get right.
Get Your Safety and Prep Gear Ready
Safety should always be your top priority when working on a roof. Before you start, make sure you have the proper personal protective equipment (PPE). This includes sturdy, non-slip work boots, safety glasses to protect your eyes from debris, and durable gloves. Depending on the height and pitch of your roof, a fall protection system might be necessary to ensure your safety. Beyond personal gear, you’ll need tools to prepare the roof deck. A powerful leaf blower or broom is essential for clearing away all dirt and debris. A clean, dry surface is non-negotiable for proper adhesion and a watertight seal that lasts for years to come.
Prep Your Roof Deck for a Flawless Installation
Before you even think about unrolling that new TPO membrane, you have to get the foundation right. Your roof deck—the wooden surface that forms the base of your roof—is the canvas for your entire roofing system. A flawless installation depends entirely on a well-prepped surface. Skipping this step is like building a house on shaky ground; it just won’t last.
Taking the time to properly prepare the roof deck ensures the TPO membrane will adhere correctly, creating a seamless, waterproof barrier that can stand up to Florida’s intense sun and storms. A clean, stable, and properly layered deck prevents future issues like leaks, bubbling, and poor insulation. This isn’t just about following instructions; it’s about setting your roof up for a long, successful life. This foundational work is what separates a roof that lasts a decade from one that lasts for thirty years. It protects your property, improves energy efficiency, and gives you peace of mind. Whether you’re a seasoned DIYer or just want to understand what your contractor should be doing, this prep work is the most critical part of the job.
Clean and Inspect the Surface
First things first: the roof deck needs to be spotless. Any dirt, dust, old nails, or leftover debris can get in the way of a strong bond, creating weak points in your new roof. Start by thoroughly sweeping the entire surface until it’s completely clear. Once it’s clean, give it a careful inspection. Look for any signs of water damage, soft spots, or rot. Press down on the wood to check for any give. If you find significant issues, it’s crucial to address them before moving forward. A compromised deck can’t support a new roof, and covering up a problem will only lead to more extensive emergency roof repair down the road.
Install Insulation and a Vapor Barrier
With a clean and solid deck, your next step is adding layers of protection. Installing proper insulation is a game-changer, especially in the Florida heat. It helps regulate your building’s temperature, which means your AC won’t have to work as hard, saving you money on energy bills. Below the insulation, a vapor barrier is essential. This layer prevents moisture and condensation from seeping up into your roofing system, which is vital for preventing mold and structural rot in our humid climate. These components are key to the performance of both residential and commercial roofing systems, ensuring your investment is protected from the inside out.
Follow These Steps to Install the TPO Membrane
With your roof deck prepped and ready, it’s time for the main event: laying down the TPO membrane. This is where your flat roof starts to take shape and become the protective barrier you need. Getting these next steps right is crucial for a watertight, long-lasting roof that can handle Florida’s weather. We’ll walk through how to position the membrane, secure it properly, and lock down the perimeter. Precision is key here, so take your time and focus on getting each step just right.
Position and Roll Out the Membrane
First things first, you need to get the TPO membrane onto the roof. These membranes typically come in large 8, 10, or 12-foot rolls. Carefully lay the sheets over the prepared insulation or cover board, making sure they are straight and flat. Think of it like rolling out a giant welcome mat for your roof. You’ll want to allow the membrane to relax for a bit before you start fastening it down, which helps remove any wrinkles from being rolled up. Proper alignment at this stage prevents issues later, ensuring your seams line up perfectly for welding. This step is fundamental for both residential roofing and commercial projects.
Secure the Membrane with the Right Fastening Pattern
Once the membrane is in position, you have to secure it to the roof deck. For a mechanically attached system, this means using special fasteners and plates. Many TPO manufacturers make this easier by printing small ‘X’ marks directly on the membrane to show you exactly where to place the fasteners. You’ll install screws and plates in a specific pattern within the seam area, usually spaced 6 or 12 inches apart. Following the correct fastening pattern is non-negotiable—it’s what gives your roof its strength to resist wind uplift during a storm. A securely fastened roof is your first line of defense against potential hail damage.
Attach the Edges and Perimeter
The perimeter of your roof is one of its most vulnerable areas, so it requires special attention. Here, you’ll use smaller, dedicated sheets of TPO membrane, often 4 or 6 feet wide. These sheets are fastened more densely to the roof deck to provide extra strength against wind forces. Once a perimeter sheet is secured, you’ll overlap the next one by about 5.5 inches. This overlap is critical because it’s where you will later use a heat welder to fuse the two sheets together, creating a single, seamless piece of membrane. Properly sealing the edges is essential for preventing water intrusion and avoiding the need for an emergency roof repair down the road.
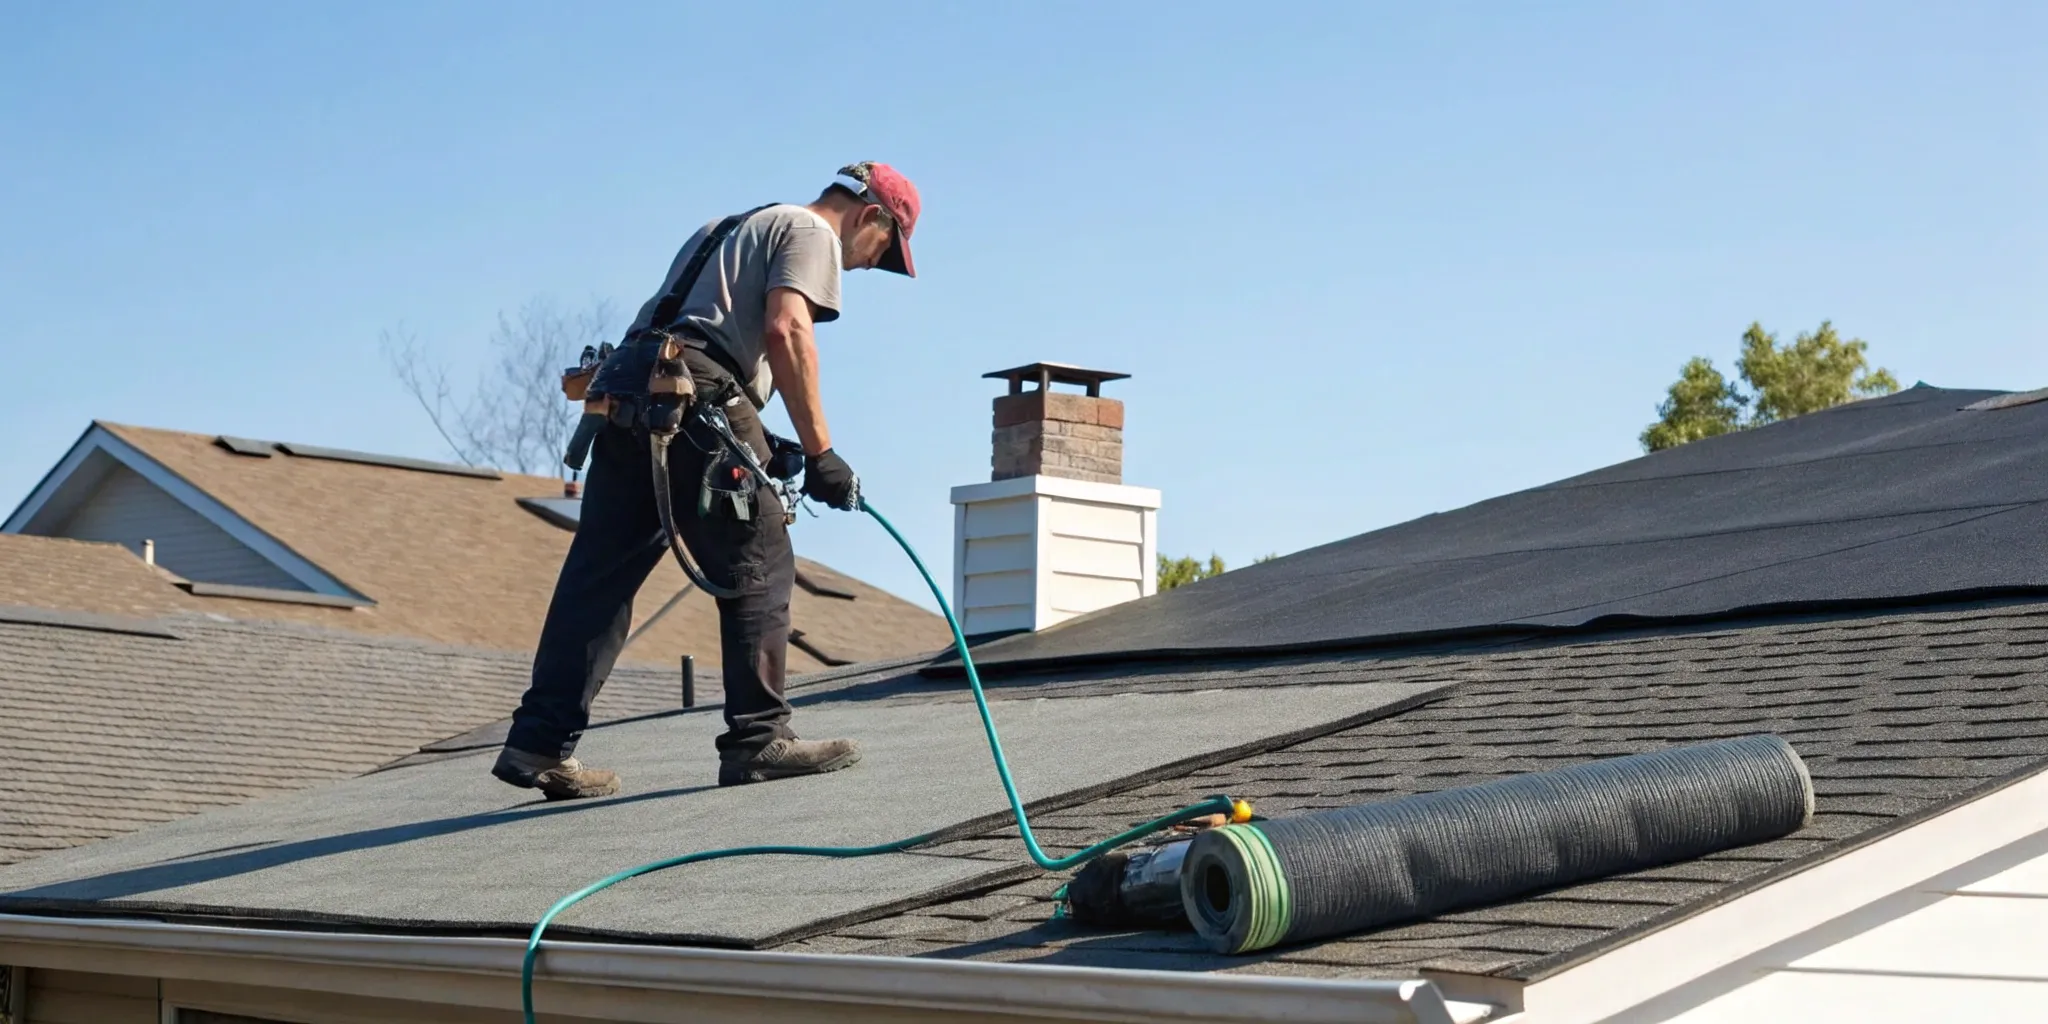
Create Watertight Seams with Proper Heat Welding
The real magic of a TPO roofing system lies in its seams. Unlike other roofing types that rely on adhesives or tapes that can degrade over time, TPO seams are heat-welded together. This process uses a hot-air welder to fuse the overlapping layers of the membrane, creating a single, continuous sheet of material across your entire roof. When done correctly, these welded seams are actually stronger than the membrane itself, providing a durable, watertight barrier that stands up to Florida’s intense rain and wind.
Achieving that perfect, leak-proof seal requires precision, the right equipment, and a deep understanding of how the material behaves under different conditions. It’s a critical step where professional expertise truly shines. A flawless weld ensures your roof will perform as expected for decades, protecting your property from the elements. For any commercial roofing project, getting the seams right is the most important part of the job. The following steps break down how professionals create these incredibly strong, watertight bonds.
Set Up Your Heat Welder Correctly
Before a single inch of seam is welded, the equipment needs to be perfectly calibrated. A professional heat welder isn’t a simple “plug-and-play” tool. Its settings for temperature, speed, and pressure must be adjusted based on the day’s specific environmental conditions, including the ambient temperature, humidity, and even wind speed. To find the sweet spot, experienced roofers perform several test welds on scrap pieces of TPO membrane directly on the roof deck. This is a crucial step because a weld that works perfectly on the ground might fail on a hot, sunny roof. By testing on-site, they can dial in the exact settings needed for a strong, consistent bond without burning or weakening the material.
Overlap and Weld Seams Like a Pro
With the welder properly calibrated, it’s time to join the membranes. The TPO sheets are laid out with a specific overlap, typically around six inches, to ensure there’s enough material to create a solid weld. An automatic welder is then guided along the seam, applying consistent heat and pressure to melt the two layers together into one monolithic piece. The resulting welded seam should be at least 1.5 inches wide. While the robot welder handles the long, straight runs, a skilled roofer uses a hand welder for detailed work around corners, pipes, and other penetrations. This combination of automated precision and manual skill is key to a successful residential roofing installation.
Test Your Seams for a Perfect Seal
A professional TPO installation isn’t finished until every seam is thoroughly inspected. After the welds have completely cooled, the roofing technician will meticulously check the entire length of every seam using a specialized tool called a seam probe. They run the probe along the edge of the weld, feeling for any voids, gaps, or unbonded areas that could potentially allow water to get in. This is a painstaking but non-negotiable quality control step. If any imperfections are found, they are immediately cleaned and re-welded with a hand welder to ensure the seal is perfect. This final check provides peace of mind that your roof is completely sealed and ready to perform.
Seal Flashing and Penetrations to Prevent Leaks
After laying and welding the main field of the TPO membrane, the next step is all about the details. This is where you make your roof truly waterproof by addressing the most vulnerable areas: the edges, corners, and anything that pokes through the roof surface. Think of it as the final line of defense against Florida’s heavy rains. Getting this part right is what separates a roof that lasts for decades from one that causes headaches and constant worry.
Even a tiny gap or an improperly sealed vent can allow water to seep underneath the membrane, leading to hidden damage that can be costly to fix. This is often where leaks begin, and it’s why meticulous attention to detail is so important. If you ever find yourself needing emergency roof repair, there’s a good chance a failure in the flashing or penetration sealing is the culprit. Taking your time here ensures the entire system works as a single, seamless barrier against the elements, giving you peace of mind when the next storm rolls in.
Install Flashing Around the Roof’s Edge
Flashing is a critical component that directs water away from the perimeter and edges of your roof. Without it, water could easily find its way under the membrane along the roofline. Proper flashing installation is essential for a watertight seal and should never be overlooked. This process involves installing custom-fabricated metal or TPO flashing pieces along all edges, corners, and parapet walls.
Each piece must be securely fastened and then heat-welded to the main TPO membrane to create a continuous, waterproof barrier. This step requires precision, as every corner and angle needs to be perfectly sealed. For large or complex commercial roofing systems, the flashing work is extensive and absolutely vital to the long-term performance of the roof.
Seal Around Pipes, Vents, and Drains
Almost every roof has penetrations—pipes, vents, drains, skylights, or HVAC units that stick through the surface. Each one of these creates a potential entry point for water if not sealed correctly. To handle this, you’ll use prefabricated TPO boots or custom-cut pieces of membrane that are fitted around the penetration.
The key is to ensure the TPO membrane overlaps and is thoroughly heat-welded to the flashing around every single pipe and vent. After installation, it’s a good idea to conduct a thorough inspection of every seal to check for any gaps or loose seams. A poorly sealed vent can compromise the entire system, so taking the time to get it right is essential for preventing water intrusion and protecting the integrity of your roof.
Avoid These Common TPO Installation Mistakes
Even with the best materials and a clear plan, a few common slip-ups can turn a promising TPO roofing project into a major headache. Getting the installation right is about more than just following the steps; it’s about understanding where things can go wrong and actively preventing those issues. A successful TPO roof installation depends on a systematic process where every detail, from the initial prep work to the final weld, is handled with precision.
Think of it like this: each step builds on the last, and a mistake early on can compromise the entire system. Rushing the job or cutting corners might save a little time upfront, but it often leads to leaks, wrinkles, and a roof that just won’t stand up to Florida’s intense weather. Taking the time to avoid these pitfalls is the best way to ensure your new roof is durable, watertight, and long-lasting. If you ever feel out of your depth, remember that a professional commercial roofing team has the experience to get it done right the first time.
Don’t Skip on Surface Prep
The success of your entire TPO installation rests on the surface you’re applying it to. Before you even think about unrolling the membrane, you need to give the roof deck a thorough inspection and cleaning. Any leftover debris, dust, moisture, or uneven spots can prevent the TPO from adhering properly and can even cause punctures down the road. Make sure the substrate is completely dry, smooth, and structurally sound. Taking this extra time ensures you have a perfect canvas for the insulation and membrane, preventing much bigger problems later on.
Avoid Incorrect Fastening Patterns
Securing the TPO membrane isn’t a guessing game. Manufacturers provide specific fastening patterns for a reason—they’re engineered to withstand wind uplift and keep your roof firmly in place during a storm. Using the wrong number of fasteners, incorrect spacing, or the wrong type of fastener for your specific roof deck can create weak points. This is especially critical in Central Florida, where high winds can easily exploit an improperly secured roof. Following the manufacturer’s guidelines and local building codes is essential for the integrity and longevity of your roofing system.
Prevent Seam Welding Errors
The seams are where your TPO roof is most vulnerable to leaks, which makes proper heat welding absolutely critical. A common mistake is hurriedly unrolling and installing the membrane without letting it relax first, which can create wrinkles that compromise the weld. It’s also vital to use the correct temperature, speed, and pressure on your heat welder. A weld that’s too hot can burn the material, while a “cold” weld won’t create a permanent, watertight bond. These weak points can fail over time, often leading to the need for emergency roof repair.
Watch the Experts: Our Favorite TPO Installation Videos
Sometimes, seeing is believing. Reading about TPO installation is one thing, but watching the process unfold can give you a much clearer picture of what it takes to get the job done right. We’ve rounded up a few of our favorite videos that break down the key steps, from laying the membrane to welding the seams. These visuals are fantastic for understanding the fundamentals and appreciating the skill involved.
However, it’s important to remember that these videos are educational tools, not DIY guides. A professional installation is crucial for the longevity and performance of your roof, especially under the Florida sun and during storm season. An experienced team knows how to handle the unique challenges of any project, whether it’s a large-scale commercial roofing job or a complex residential layout with multiple vents and skylights. They have the specialized equipment and training to ensure every seam is perfectly welded and every flashing is watertight. Think of these videos as your visual guide to the process, showing you what a quality installation should look like from start to finish. This way, you’ll know exactly what to look for when you hire a pro.
Official Manufacturer How-To’s
Going straight to the source is always a smart move. Manufacturer videos give you the official, by-the-book overview of an installation. They’re designed to be clear, comprehensive, and show the process under ideal conditions, which is a great way to establish a baseline for quality. For an excellent starting point, we recommend this TPO roof installation video from CentiMark. In just a few minutes, it walks you through the entire process from start to finish. It’s the perfect primer for anyone new to TPO roofing and gives you a solid foundation of what to expect from a professional job.
Demos from Professional Roofers
While manufacturer videos show the ideal process, demos from professional roofers show you the technique in action. These videos often focus on specific, critical skills that make or break an installation. For example, mastering the heat weld is essential for creating watertight seams that last for decades. This demonstration from CentiMark shows an experienced roofer heat welding TPO to a metal edge. Watching a pro handle the tools and material up close gives you a much better appreciation for the skill involved in getting every detail just right and ensuring a perfect seal.
Training from Industry Groups
If you want to explore different techniques or prefer a different format, videos from industry trainers and dedicated roofing channels are a goldmine. They often break down complex steps in an easy-to-digest way. For a quick, visual-first look, OYH Roofing has a great TikTok that covers essential TPO laying methods. If you’d rather follow a more detailed, step-by-step tutorial, RoofRepair101 offers a thorough guide on how to install a single-ply TPO roof on YouTube. These resources are excellent for learning, but they can’t replace the hands-on experience of a certified professional who can adapt to real-world conditions.
Run a Final Quality Check on Your Installation
The membrane is down, the seams are welded, and you’re almost at the finish line. But before you pack up your tools, there’s one last crucial step: the final quality check. This isn’t just about admiring your work; it’s about making sure your new TPO roof is ready to handle everything from blistering sun to torrential downpours for years to come. A thorough inspection at this stage is your best defense against future leaks and problems. A successful TPO roof installation is a systematic process, and this final review ensures every part of that system—from the substrate prep to the final flashing—is working together perfectly. Taking the time to double-check everything now can save you from major headaches and costly repairs later on, ensuring your investment is protected and your property stays dry. Think of it as the final seal of approval on a job well done, giving you confidence that your roof is secure, watertight, and built to last. This step separates a good installation from a great one, and it’s what guarantees your roof will perform as expected when the next big storm rolls through.
Use a Post-Installation Inspection Checklist
Think of this as your final walkthrough. Grab a notepad and systematically go over the entire roof surface. You’ll want to conduct a thorough inspection, looking for any potential red flags. Are there any loose seams or gaps? Is the flashing around vents, pipes, and edges completely sealed and secure? Check for any punctures, blisters, or wrinkles in the membrane itself. Make sure the entire area is clean and free of leftover tools, fasteners, or debris. For extra peace of mind, you can even perform a water test by lightly spraying the roof and checking for any pooling or leaks, which will confirm your roof is watertight.
Test Seams and Membrane Attachment
The success of your TPO roof really comes down to the details, especially the seams. This is where most leaks happen, so give them your full attention. Take a seam probe or a dull, flat-edged tool and gently run it along every inch of your heat-welded seams. You’re checking for any spots that didn’t fuse correctly. The probe shouldn’t be able to slide into the seam at all. Next, check the membrane attachment. Whether you used fasteners or adhesive, confirm the membrane is securely attached across the entire roof deck, paying close attention to the perimeter and corners where wind uplift is strongest.
Know When to Call a Professional
While a DIY check is a great final step, nothing beats the trained eye of an expert. If you feel uncertain about any part of your installation or just want a professional opinion, it’s always a smart move to call in a pro. A professional TPO roofer will conduct a comprehensive roof inspection, spotting subtle issues you might have missed. They have the experience to verify that the substrate was prepped correctly and that every seam is perfectly welded. For both commercial roofing and residential projects, an expert sign-off provides ultimate peace of mind. It ensures your roof is not just finished, but finished right.
Related Articles
- TPO Roofing Details: A Complete Breakdown
- TPO Roofing Installation Cost: A 2025 Guide
- TPO Roofing Cost: A Complete Price Breakdown
Frequently Asked Questions
Is TPO roofing only for commercial buildings? While TPO is a top choice for commercial properties with large, flat roofs, it’s also a fantastic and increasingly popular option for residential homes. If your house has a low-slope or flat roof section—like over a garage, a porch, or as part of a modern architectural design—TPO provides a sleek, durable, and energy-efficient solution that traditional shingles can’t offer in those applications.
How long can I expect a TPO roof to last in the Florida climate? A professionally installed TPO roof is built to withstand Florida’s unique challenges, from intense UV rays to heavy rain. You can generally expect a service life of 20 to 30 years. The key to reaching that lifespan is a quality installation, as the durability of the roof is highly dependent on how well the seams are welded and the flashing is sealed.
This guide seems very detailed. Can I install a TPO roof myself? While it’s great to understand the process, TPO installation is a job best left to experienced professionals. The equipment, like a commercial-grade heat welder, is specialized and requires skill to use correctly. Achieving a truly watertight seal that will last for decades depends on precise technique, especially when welding seams and flashing around vents. A small mistake can lead to significant leaks, so hiring a pro protects your investment.
What makes heat-welded seams so much better than other methods? Think of it this way: adhesives and tapes can degrade over time when exposed to sun and moisture, eventually creating weak points. Heat welding, on the other hand, physically fuses the TPO membrane sheets together into a single, solid piece. The resulting seam is incredibly strong—often stronger than the membrane itself—creating a permanent, monolithic barrier against water.
What are the most important things to check after an installation is complete? Pay close attention to the details. The most critical areas are the seams and penetrations. Run your eyes along every seam to ensure it looks flat, clean, and consistent. Then, carefully inspect the seals around every pipe, vent, and corner. The flashing should be tight and completely integrated with the roof membrane, leaving absolutely no gaps for water to find its way in.