

In Central Florida, a roof has to work hard. It faces intense sun, heavy downpours, and the constant threat of high winds. That’s why a proper installation isn’t just about curb appeal—it’s about structural integrity and safety. The specific techniques used to secure your shingles, flash your vents, and seal your valleys are what make the difference when a storm rolls through. This content focuses on the installation process for asphalt shingle roofs and what homeowners can expect during the project. For a complete guide covering replacement, costs, and material selection, visit our asphalt shingle roof replacement page.
Key Takeaways
- A solid foundation is non-negotiable: Before laying a single shingle, ensure your roof deck is clean, dry, and structurally sound. Proper underlayment and drip edge installation are your first lines of defense against water damage.
- Details determine durability: The longevity of your roof depends on precise installation. Adhering to the correct nailing pattern, staggering shingles properly, and meticulously flashing around vents and chimneys are essential for a weather-tight seal.
- Proactive care prevents major problems: Regular maintenance, like keeping your roof and gutters clear of debris, helps you spot minor issues before they escalate. For complex jobs or post-storm inspections, hiring a professional protects your warranty and ensures the job is done right.
What Are Asphalt Shingles?
If you’re picturing a classic American roof, you’re probably thinking of asphalt shingles. They’re the most popular roofing material for a reason: they offer a fantastic blend of durability, affordability, and style that works for nearly any home. At their core, asphalt shingles are made of a fiberglass base mat coated with waterproof asphalt and topped with ceramic granules that protect them from UV rays. This simple construction makes them incredibly effective at shielding your home from the elements.
The installation process is methodical and designed for maximum water protection. It starts with placing starter strips at the roof’s edge, followed by overlapping courses of shingles. Each row is carefully staggered to ensure there are no direct paths for water to seep through. This layered system is what makes an asphalt shingle roof so reliable. Whether you’re replacing an old roof or building a new home, understanding what these shingles are and how they work is the first step toward a successful project. For most homeowners in Florida, they are the go-to choice for dependable residential roofing.
Explore Your Shingle Options
When you start looking at asphalt shingles, you’ll find a few main types to choose from. The most basic are 3-tab shingles, which are affordable and have a flat, uniform look. A step up from there are architectural or dimensional shingles. These are thicker, last longer, and have a more varied, textured appearance that can mimic the look of wood shake or slate. At the high end, you have luxury shingles, which offer the best performance and most premium designs. The asphalt shingles you choose make up the bulk of the material costs for your roof replacement, so your budget is the most important factor in this decision. Think about what style you want and how long you need your roof to last.
The Benefits: Durability and Style
So, why are asphalt shingles so popular? They hit the sweet spot between cost and longevity. A new shingle roof is a smart investment that protects your home, improves its energy efficiency, and gives your curb appeal a major lift. In a place like Central Florida, having a roof that can stand up to intense sun, heavy rain, and high winds is non-negotiable. Modern shingles are engineered for exactly that. They also come in a huge variety of colors and styles, so you can find the perfect look to match your home’s aesthetic. After a storm, a solid roof is your first line of defense, and a hail damage inspection can ensure it stays that way.
Budgeting for Your Project
Let’s talk numbers. The total cost of your new roof will depend on a few things: the size and complexity of your roof, the type of shingles you select, and labor rates in your area. On average, roofing labor costs can range from $30 to $100 per hour, not including materials and supplies. It’s a good idea to get a few detailed quotes to compare. Don’t forget to factor in the cost of removing and disposing of your old roof, as well as any necessary repairs to the underlying roof deck. It can feel like a big expense, but remember that flexible financing options are often available to make the project more manageable.
Gather Your Tools and Materials
Before you climb that ladder, let’s get everything you need lined up on the ground. A successful roofing project is all about preparation, and that means having the right tools, materials, and safety equipment ready from the start. Getting organized now will save you countless trips up and down the ladder and help you work more efficiently and safely. Think of this as your pre-flight checklist; taking the time to gather everything ensures a smoother process once you’re actually on the roof.
The Roofer’s Toolkit
Having the right tools makes all the difference. You don’t need a truck full of specialized equipment, but a few key items are non-negotiable for installing shingles correctly. Your basic toolkit should include a hammer or roofing nailer, a utility knife with plenty of extra blades, a measuring tape, and a chalk line for snapping straight guidelines. A pry bar will be essential for removing old shingles, and a caulking gun will be needed for sealants. Having a tool belt to keep everything within reach will make your work much easier and safer once you’re off the ground.
Essential Safety Gear
This is the most important part of your prep work. Working on a roof is inherently dangerous, so never cut corners on safety. Your essential gear includes a hard hat, safety glasses, and sturdy work gloves to protect you from debris and sharp materials. You’ll also need boots or shoes with high-traction soles. Most importantly, invest in a personal fall arrest system, which includes a safety harness, lanyard, and anchor point. This isn’t just about avoiding a minor injury; it’s about preventing the kind of accident that requires an emergency roof repair call for more than just your shingles.
Your Materials Checklist
A strong roof is more than just the shingles you see from the street. The components underneath are just as critical for keeping your home dry and protected. Your shopping list should obviously include the asphalt shingles themselves, but don’t forget the starter strips that go along the eaves. You’ll also need roofing underlayment, which acts as a secondary water barrier. Drip edge, flashing for valleys and vents, and roofing cement are also crucial. Finally, make sure you have the right roofing nails for your specific residential roofing project.
Why You Need a Clear Forecast
Your safety and the quality of your new roof depend heavily on the weather. Never attempt to work on a roof that is wet, icy, or frosty, as surfaces become incredibly slippery. Check the forecast and plan your project for a clear, dry day. High winds can also be dangerous, making it difficult to handle large shingles and creating a fall risk. Beyond safety, weather affects the installation itself. Most shingles have a thermally activated asphalt sealant that requires warmth from the sun to bond properly, so a cold, overcast day can prevent your roof from sealing correctly.
Prep Your Roof for Shingles
Before a single new shingle is laid, the success of your roofing project is determined by the quality of your prep work. A solid, clean, and well-prepared foundation is essential for a roof that not only looks great but also provides lasting protection. Taking the time to properly prepare the surface ensures your new shingles will adhere correctly and perform as they should for years to come. This phase involves everything from ensuring your safety to meticulously inspecting the underlying structure. Rushing these steps can lead to leaks, premature wear, and other costly problems down the road. Think of it as setting the stage—the better the setup, the better the final performance.
Your Pre-Installation Safety Check
Working on a roof is serious business, and your safety should always be the top priority. Before you even think about climbing that ladder, make sure you have the right personal protective equipment (PPE). This isn’t the place to cut corners. You’ll need a full set of safety gear, including a properly fitted harness, a hard hat, heavy-duty work gloves, and safety glasses to protect your eyes from debris. Wear sturdy, slip-resistant work boots and long pants to protect your legs. A tool belt will keep your hands free and your essential tools within easy reach, preventing you from making risky movements to grab something you need. This gear protects you not just from a fall but also from falling debris.
Measure Your Roof Accurately
Guessing how many shingles you need is a recipe for frustration and wasted money. To get an accurate count, you’ll need to measure your roof. Start by measuring the length and width of each plane or section of your roof. Multiply these two numbers to find the square footage of that section. Do this for every plane, then add all the totals together to get the total square footage of your roof. In roofing, materials are often sold by the “square,” which is equal to 100 square feet. To figure out how many squares you need, simply divide your total square footage by 100. It’s always a good idea to add about 10-15% extra to account for waste, starter shingles, and ridge caps.
Inspect the Roof Deck
Once the old shingles are off, you’ll have a clear view of the roof deck—the wooden foundation of your entire roofing system. This is a critical inspection point. The deck must be in excellent condition before you can proceed. Walk around carefully and check for any soft spots, which could indicate rot or water damage. The surface needs to be smooth, clean, and completely dry. Make sure all the sheathing is securely fastened, and look for any holes or gaps that need to be repaired. If you find widespread issues, it’s a sign of a deeper problem that new shingles won’t fix. Addressing underlying deck damage is crucial for the structural integrity of your residential roofing system.
Tear Off the Old Shingles
Removing the old roofing material is a physically demanding but necessary step. Using a roofing fork or a square-end shovel, work your way from the peak of the roof downwards, prying up the old shingles and nails. As you work, be mindful of where the debris is falling to avoid damaging windows, siding, or landscaping below. It’s helpful to have a tarp on the ground and a dumpster nearby to keep the cleanup manageable. Once all the shingles are removed, go back over the entire roof deck with a hammer or pry bar to pull out any stubborn leftover nails. You want the surface to be completely clear and smooth before moving on.
Install Underlayment and Drip Edge
With a clean deck, your next step is to create a waterproof barrier. This starts with installing a metal drip edge along all the eaves (the lower edges) of the roof. The drip edge prevents water from getting under the roofing material and rotting the fascia board. Next, you’ll roll out the roofing underlayment, which is typically asphalt-saturated felt or a modern synthetic product. This layer provides another line of defense against water intrusion. Start at the bottom and work your way up, overlapping each row by a few inches. Finally, install a starter strip along the eaves and rakes (the sloped ends) to ensure the first course of shingles has a proper seal.
Your Step-by-Step Installation Guide
Once your roof deck is prepped and ready, it’s time for the main event: laying the asphalt shingles. This is where precision and patience really pay off. A well-installed shingle roof not only looks fantastic but also provides the durable protection your home needs to stand up to Central Florida’s sun and storms. Getting the details right—from the very first starter strip to the final ridge cap—is what separates a good roof from a great one.
Following a systematic process is key to ensuring every shingle is perfectly placed, properly secured, and ready to shed water effectively. We’ll walk through the core steps of the installation, covering the essential techniques for creating a strong, weather-tight, and professional-looking roof. Remember, this is a major project, and if you ever feel unsure, our residential roofing team is always here to help.
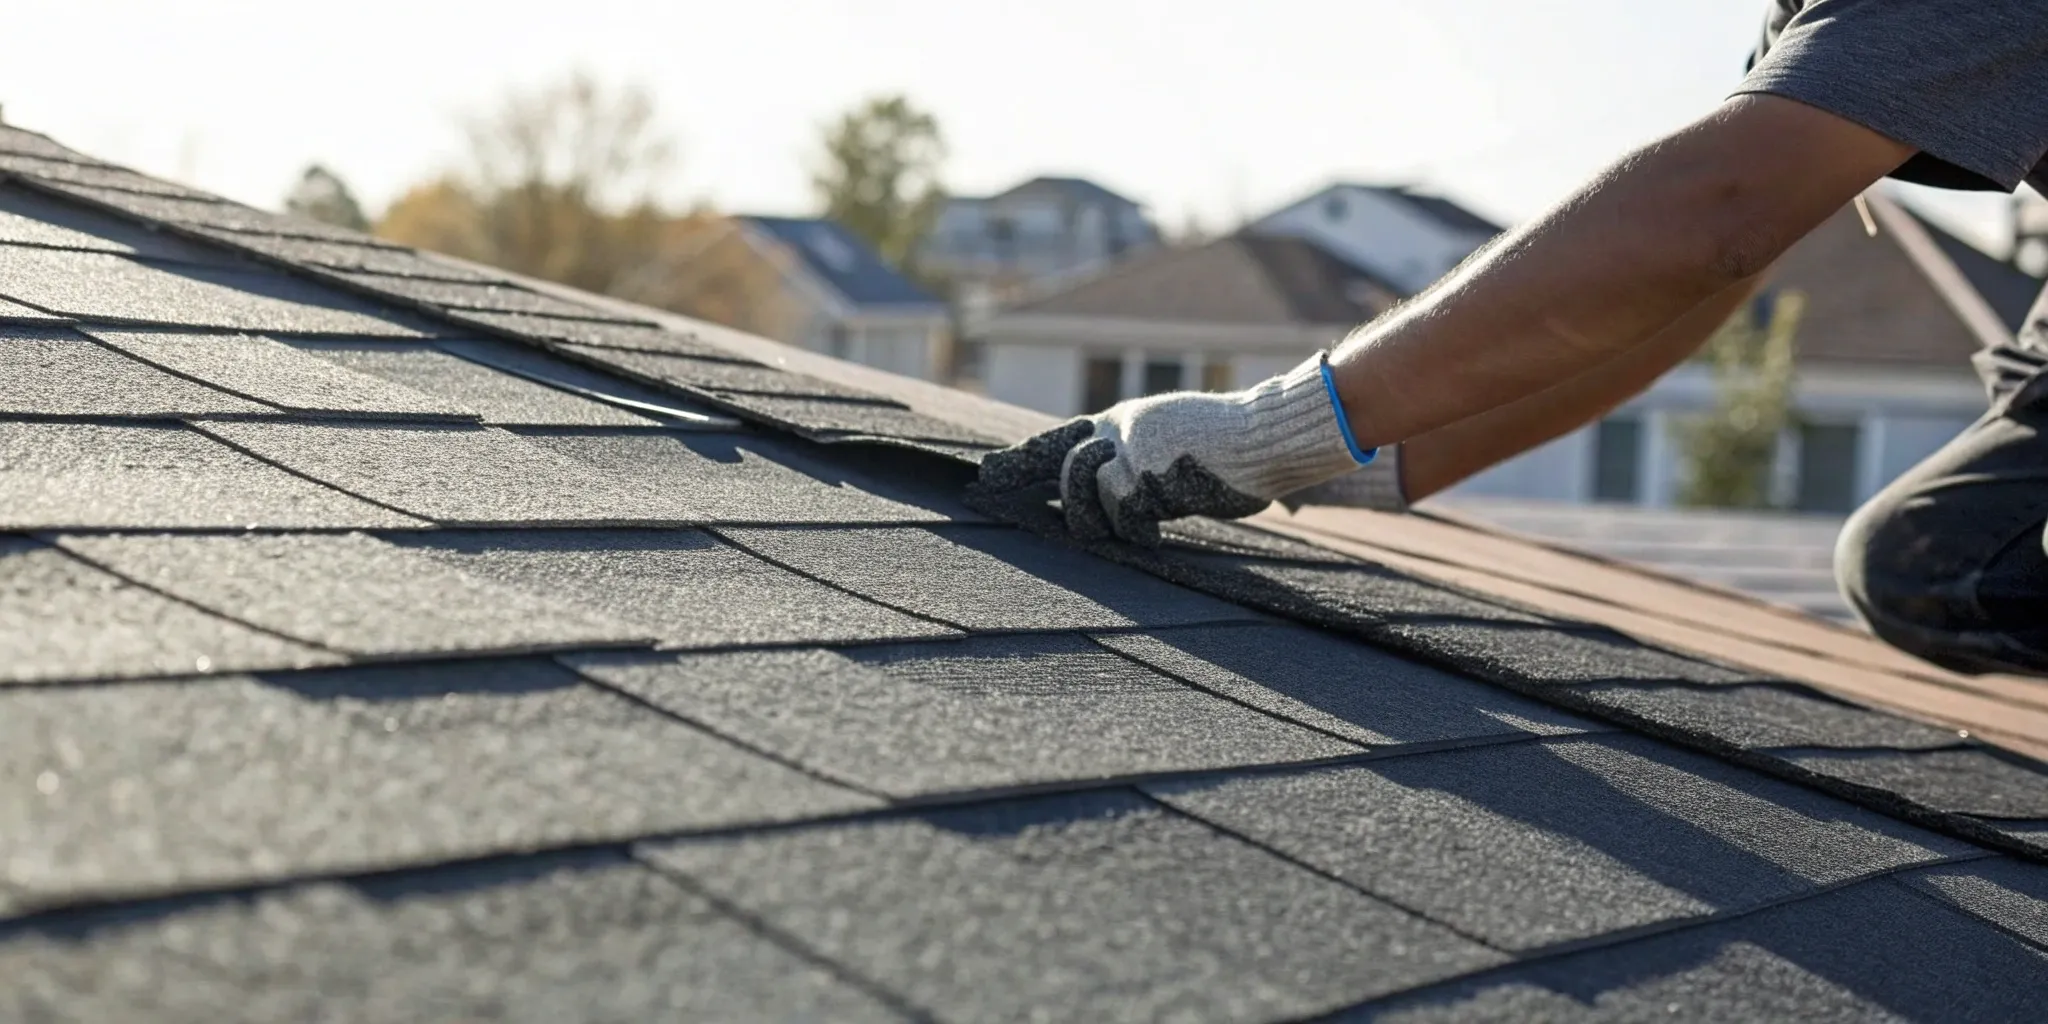
Lay the Starter Strips
Think of starter strips as the foundation for your entire shingle system. They are the first layer installed along the eaves and rakes (the edges) of your roof. Their primary job is to provide a continuous seal of adhesive that bonds to the first course of shingles, preventing wind from lifting them up.
Install the starter strip with its asphalt adhesive line facing outward, right along the edge. It should hang over the drip edge by about 1/8 of an inch. When you lay the first row of actual shingles, it will overhang the starter strip by another 1/8 inch, creating a total 1/4-inch overhang. This small detail is crucial for directing water straight into the gutters instead of behind them.
Master the Nailing Pattern
How you nail your shingles is just as important as which shingles you choose. Improper nailing is one of the most common causes of roof failure, especially during a hurricane or hailstorm. Each shingle has a designated nailing strip—nailing outside of this zone can void your warranty and compromise your roof’s integrity.
Depending on local building codes and the shingle manufacturer’s instructions, you’ll use four to six nails per shingle. For extra wind resistance, which is a must in Florida, six nails are recommended. Place the first nail about one inch from the shingle’s edge, the next about a foot over, and so on. This precise pattern ensures the shingle is held down securely and can withstand high winds and potential hail damage.
Establish Your Shingle Layout
A professional-looking roof has clean, straight lines. To achieve this, you need a consistent layout. Most architectural shingles are installed using a 6-inch staggered pattern. This means each new course, or row, starts 6 inches over from the edge of the shingle in the row below it. This offset pattern not only looks good but also ensures the seams between shingles don’t line up, which is critical for preventing water intrusion.
To keep your rows perfectly straight as you work your way up the roof, snap horizontal chalk lines as a guide. Using the factory edges of the shingles will help you maintain consistent cuts and a uniform appearance across the entire roof surface.
Tackle Valleys and Ridges
Valleys (where two roof planes meet) and ridges (the peak of the roof) are high-stress areas that require special attention. For the rake edges, always place the cut side of the shingle toward the inside of the roof, leaving the clean, factory-finished edge facing out. This simple technique helps prevent water from getting underneath the shingles at the ends of the roof.
When you reach the top, you’ll install ridge cap shingles. Snap a chalk line along the peak to ensure your ridge caps are installed in a perfectly straight line. Each piece is nailed on its tar line with two nails on each side of the ridge, overlapping the previous piece to create a weather-tight seal.
Work Around Vents and Chimneys
Anywhere something pokes through your roof—like a vent pipe, skylight, or chimney—is a potential spot for a leak. That’s why proper flashing is non-negotiable. Flashing is a thin material, usually metal, that directs water away from these vulnerable areas. For spots where shingles meet a vertical wall, like a chimney, you’ll use a technique called step flashing, weaving metal pieces in with each course of shingles.
Installing flashing correctly is a detailed process that requires precision. If it’s not done right, you could be calling for an emergency roof repair after the next big rainstorm. Take your time here, ensuring every penetration is sealed tightly to keep your home dry.
Troubleshoot Common Installation Problems
Even with the best preparation, you can run into a few snags during your shingle installation. Knowing what to look for helps you solve problems before they become major headaches. From ensuring proper airflow to dealing with Florida’s unpredictable weather, here’s how to handle some of the most common challenges that pop up on the job.
Get Your Roof Ventilation Right
A roof needs to breathe, especially in the Florida heat. Improper ventilation traps hot, moist air in your attic, which can bake your shingles from below and lead to premature aging and curling. Many shingle roofing problems stem from poor airflow, so it’s critical to make sure your installation allows for it. Check that your intake and exhaust vents are clear and properly sized for your attic space. This simple step protects your shingles, improves your home’s energy efficiency, and helps prevent moisture buildup that can damage your roof structure over time.
Handle Complex Roof Angles
If your roof has multiple peaks, valleys, or dormers, you know it has character—but those features also create challenges. One of the main goals of a solid roof installation is to prevent leaks and water damage, particularly in areas with complex angles. These spots require precise cutting, sealing, and flashing to create a watertight barrier. Take your time here, as a small gap can let water seep in and cause serious issues down the road. For intricate residential roofing designs, careful planning and execution are key to a leak-free finish.
Manage Weather Delays
In Central Florida, a sunny morning can turn into a stormy afternoon in a flash. Weather is the one variable you can’t control, and it’s a major factor in any roofing project. Installing shingles on a wet surface or in high winds can compromise the adhesive and lead to blow-offs. Always check the forecast and plan your work in clear, dry windows. If unexpected rain arrives, secure your work area with a tarp to protect the exposed roof deck. Planning for potential weather delays is essential for a successful installation and prevents the need for emergency roof repair later.
Fix Common Installation Mistakes
A few small mistakes can lead to big problems. Three of the most common errors in an asphalt shingle installation are incorrect nail placement, using shingles on the wrong roof pitch, and skipping the underlayment. Nails driven too high won’t hold the shingle properly, while nails driven too deep can tear right through it. Likewise, standard shingles aren’t designed for low-slope roofs, which require special application techniques. Always use the correct underlayment and follow the manufacturer’s nailing instructions to ensure your roof is secure and can withstand future hail damage.
Know When to Call a Professional
Taking on a home improvement project yourself can be incredibly rewarding. But when it comes to your roof, the stakes are much higher than a crooked picture frame or a bad paint job. A roofing project involves significant risks, complex building codes, and a major financial investment. While replacing a few missing shingles might be a manageable task, a full roof installation is a different story. It requires specialized skills, tools, and knowledge to ensure it’s done safely and correctly.
Deciding between DIY and hiring a professional isn’t just about saving money on labor. It’s about protecting your home, your family, and your investment for years to come. Before you climb that ladder, it’s important to honestly assess the scope of the project and your own limitations. Understanding the potential pitfalls of a DIY installation can help you make the smartest choice for your home. Sometimes, the most successful project is the one you know to hand off to an expert who can guarantee a secure, long-lasting, and worry-free result.
Is This Project Too Big for DIY?
Let’s be direct: working on a roof is dangerous. Professional roofers undergo extensive safety training and use specialized equipment for a reason. The risk of a fall is serious, and without the right experience, you could also cause unintended damage to your roof’s structure. A small leak from an improperly installed shingle can lead to rot, mold, and costly interior repairs down the line. If you’re facing a large-scale replacement or have a complex roof with steep pitches and multiple levels, it’s best to hire trained professionals. For urgent issues, an emergency roof repair service can safely and quickly address the problem before it gets worse.
Why Local Building Codes Matter
Roofing isn’t just about nailing down shingles; it’s a construction project governed by strict regulations. You should always check local building codes before starting any work. Here in Florida, these codes are especially important because they are designed to ensure your roof can withstand high winds and heavy rain. A professional roofing company is already an expert on these local requirements, from the specific nailing patterns to the type of underlayment required. They handle the permitting process and ensure every aspect of the job is up to code, saving you from potential fines or the nightmare of having to redo the work to pass an inspection.
Protect Your Investment and Warranty
Asphalt shingles come with a manufacturer’s warranty, but it’s not unconditional. To keep that warranty valid, you must follow the specific instructions for the shingles you are using, especially for how much shingle is exposed, how much they overlap, and where to place nails. A small mistake in the installation process can void the warranty entirely, leaving you without coverage if the materials fail prematurely. Hiring a certified professional ensures the job is done to the manufacturer’s exact specifications. This not only protects your warranty but also gives you the peace of mind that comes with a workmanship guarantee from the installer.
DIY vs. Pro: A Cost Breakdown
The biggest reason homeowners consider a DIY roof installation is to save on labor, which can make up a significant portion of the total cost. While you might save money upfront, it’s important to consider the potential hidden expenses. You’ll need to buy or rent specialized tools, arrange for waste disposal, and account for material overages. More importantly, a single mistake could lead to leaks and damage that cost far more to fix than the initial labor savings. Professional residential roofing services provide a clear, upfront cost and often offer flexible financing options, making a high-quality, guaranteed installation more accessible.
Keep Your New Roof in Top Shape
Your new asphalt shingle roof is a major investment in your home’s safety and curb appeal. Now that the installation is complete, the best thing you can do is protect it. A little proactive care goes a long way, especially here in Florida where sun, rain, and storms can be relentless. Regular maintenance helps you catch small issues before they turn into big, expensive problems, ensuring your roof lasts for its full lifespan.
Think of it like caring for a new car; you wouldn’t skip the oil changes. Your roof needs the same kind of attention. By performing simple checks and keeping up with basic cleaning, you can prevent common issues like leaks, water damage, and premature aging. This guide will walk you through exactly what to look for and what to do each season. Following these steps will help you maintain your roof’s integrity and give you peace of mind, knowing your home is well-protected. It’s about being observant and consistent. You don’t need to be a roofing expert to keep your roof in great shape, you just need to know what to look for. If you ever spot something that seems off, remember that a professional hail damage inspection can identify issues you might miss and provide a clear path forward.
Your Seasonal Maintenance Checklist
A great way to stay on top of your roof’s health is to create a simple seasonal routine. After major storms or at least twice a year, take a few minutes to walk around your property and look up. Check for any debris that has collected on the roof, especially in the valleys where different roof planes meet. Leaves, pine needles, and branches can trap moisture against your shingles, which can lead to water damage over time. Also, make a point to inspect the areas around your chimney and vents, as these are common spots for debris to build up and cause problems.
How to Inspect Your Shingles
From the ground, you can spot many tell-tale signs of shingle wear and tear. Look for shingles that are curling at the edges, cracking, or missing entirely. Years of exposure to intense UV rays and harsh weather can cause the asphalt to break down. Another key indicator is finding a lot of loose granules—the sandpaper-like material on the shingle’s surface—in your gutters or on the ground near your downspouts. These granules protect the shingle from the sun, so when they start to fall off, it’s a sign your roof is aging and becoming more vulnerable to damage.
Spot Early Warning Signs of Damage
Catching damage early is the best way to avoid a crisis. Beyond looking at the shingles themselves, keep an eye out for other warning signs. If you notice any water stains on your ceilings or walls, it’s a clear sign of a leak. It’s also a good idea to occasionally check your attic during the daytime. If you can see beams of light coming through the roof deck, you have a problem that needs immediate attention. Other red flags include moss or algae growth, which can trap moisture, or any visible damage after a storm. If you see any of these signs, it might be time to call for an emergency roof repair.
Simple Tips for Preventive Care
Preventive care is all about simple, consistent habits. The most important task is keeping your roof clean. Regularly remove any leaves, branches, or other debris that lands on it. This simple step prevents moisture from getting trapped against your shingles and causing them to deteriorate. Just as important is keeping your gutters and downspouts clear. When gutters are clogged, water can back up and seep under the edge of your roof, potentially damaging the roof deck and your home’s interior. These small actions are fundamental to any good residential roofing maintenance plan and will help you get the most out of your investment.
Make Your Roof Last Longer
An asphalt shingle roof is a significant investment, and you want to get the most out of it. With a bit of proactive care, you can extend its lifespan and keep your home protected for years to come. It all comes down to understanding our unique Florida climate, staying on top of small issues, and knowing when to call for a professional opinion. These simple habits will help you maintain your roof’s integrity and prevent small problems from turning into major headaches.
Protect Your Roof from the Florida Climate
Here in Florida, our roofs face a tough combination of intense sun, high humidity, and heavy rain. This is why proper attic ventilation is so critical. Without enough airflow, heat and moisture get trapped in your attic, essentially baking your shingles from below and creating a perfect environment for mold. As experts from Sheffield Metals note, “Improper ventilation is the cause of many shingle roofing problems.” A professional installation ensures your roof has the ventilation it needs to breathe, which helps shingles last longer and keeps your home more comfortable.
Why Acting on Small Repairs Matters
It’s easy to ignore a single missing shingle or a small water spot on the ceiling, but these are often early warnings. “Many roofing issues start small and worsen over time, so early detection may help you avoid costly repairs and serious damage,” according to Amica Insurance. A tiny leak can lead to rotted wood, damaged insulation, and interior water damage during the next big storm. If you find yourself constantly patching the same spots, it might be a sign that your roof is nearing the end of its life. Addressing issues promptly with an emergency roof repair can save you a lot of money and stress down the road.
Schedule a Professional Inspection
While you can spot obvious problems from the ground, a trained professional sees things differently. They can safely get on your roof to check for subtle issues like granule loss, cracked shingles, or failing flashing around chimneys and vents. If you’ve been through a recent storm, a professional hail damage inspection can identify damage that isn’t visible from your yard. From inside your attic, you can look for large beams of light or noticeable water stains, which are clear signs you need an expert opinion. Hiring a professional ensures the job is done right and up to local building codes.
Related Articles
- Your Guide to Residential Roofing (2021)
- 5 Reasons Asphalt Shingles Save You Money – Skylight Roofing Inc.
- Types of Roofs and Shingles: Everything You Need to Know
- The Ultimate Guide to Residential Roofing Services: Protecting Your Home from Top to Bottom – Skylight Roofing Inc.
- 2024 Comprehensive Commercial Roofing Guide for Businesses – Skylight Roofing Inc.
Frequently Asked Questions
How long can I expect a new asphalt shingle roof to last in the Florida climate? While architectural shingles are often rated for 30 years or more, the intense sun and high humidity in Florida can be tough on any roofing material. With a professional installation that includes proper ventilation and regular maintenance, you can realistically expect your roof to last 20 to 25 years. The key is preventing heat and moisture from getting trapped in your attic, which is what truly ages a roof in our climate.
Is it okay to install a new layer of shingles over my existing ones? This is a common question, but it’s a shortcut we never recommend. Adding a second layer puts a tremendous amount of extra weight on your home’s structure. More importantly, it prevents you from inspecting the underlying roof deck for soft spots, rot, or water damage. Tearing off the old roof is the only way to ensure you’re building on a solid, secure foundation.
What’s the most common mistake people make when installing their own roof? Improper nailing is easily the biggest and most costly mistake. Every shingle has a specific nailing strip, and placing nails too high, too low, or driving them in at an angle can void the manufacturer’s warranty. More critically, it creates a weak point that allows shingles to be lifted and torn off by high winds, which is a major risk here in Florida.
After a big storm, what are the first signs of roof damage I should look for? You can spot a lot from the safety of the ground. Walk around your house and look for any shingles that are missing, cracked, or lifted. Check your gutters and downspouts for an excessive amount of shingle granules, which look like coarse black sand. Also, look for dents on your metal flashing or vents, as this is a clear indicator of hail damage.
My roof isn’t that old, but it has dark streaks and looks discolored. What causes that? Those dark streaks are almost always a type of algae called Gloeocapsa magma, which thrives in warm, humid environments like ours. While it’s primarily a cosmetic issue that makes your roof look old, it can be cleaned. If you’re planning a new roof, it’s worth looking into shingles that have built-in, algae-resistant technology to keep your roof looking its best for longer.