
That unmistakable drip… drip… drip is a sound no homeowner wants to hear. A roof leak can feel like a major crisis, sparking immediate worries about water damage, costly repairs, and where to even begin. But before you panic, take a breath. Knowing the right steps can turn that feeling of helplessness into a sense of control. This guide is your first-aid kit for a leaking roof. We’ll walk you through everything from finding the source of the problem to making a temporary fix and understanding the full process. Learning how to repair a leak in your roof starts with a calm, methodical approach, and we’re here to show you the way.
Key Takeaways
- Stay Ahead of Leaks with Routine Checks: Make a habit of inspecting your roof annually and after big storms. Keeping gutters clear and trimming overhanging branches are simple, effective ways to prevent water damage before it starts.
- Look for Leaks at Penetrations and Seams: Water usually finds its way in where something interrupts the roof’s surface. Check the seals around vents, chimneys, and skylights, as well as any damaged shingles or flashing, as these are the most common entry points.
- Know When to Call for Professional Help: While you can fix a single cracked shingle, widespread damage or feeling unsafe on a ladder are clear signs to call a professional. A trusted roofer ensures the job is done safely and correctly, protecting your home and your peace of mind.
What Causes a Roof to Leak?
That first drip from the ceiling is always a surprise, and never a good one. Understanding what causes a roof to leak is the first step toward fixing it and getting your peace of mind back. Most leaks don’t happen in the wide, open areas of your roof. Instead, they usually start where something interrupts the roofing surface. Think of it this way: any place where your roof has a seam, a join, or an object passing through it is a potential entry point for water.
From aging materials worn down by the Florida sun to sudden storm damage, several factors can compromise your roof’s integrity. Knowing the common culprits helps you identify where to look first, saving you time and preventing a small issue from turning into a major headache. Let’s walk through the most common causes, the high-risk spots to check, and the signs that tell you a leak has started.
Common Culprits Behind Leaks
Leaks often begin at points of penetration. Anything that sticks out of your roof—like vents, chimneys, or skylights—creates a seam that must be perfectly sealed to keep water out. Over time, the sealants around these features can degrade, crack, or pull away, creating a direct path for rain. Another frequent issue is a simple misplaced or loose nail. A nail that wasn’t driven in correctly or has worked its way up over time, known as a “nail pop,” can lift the shingle just enough for water to seep underneath and find its way into your home.
High-Risk Spots on Your Roof
When you’re looking for a leak, focus on the most vulnerable areas. Start by checking for any missing, cracked, or damaged shingles, which can be a clear sign of wear or recent storm damage. Pay close attention to the flashing—those metal strips installed around chimneys, vents, and walls. If the flashing is loose, rusted, or damaged, it can no longer form a watertight seal. Also, inspect the vent boots, which are the rubber or metal bases around plumbing pipes. The rubber seals can become brittle and crack, allowing water to trickle down the pipe and into your attic. A thorough hail damage inspection can often reveal these subtle but critical issues.
Telltale Signs of a Leak
The most obvious sign of a leak is a water spot on your ceiling or walls. You might also notice peeling paint, a musty odor in your attic, or visible drips. However, the location of the water stain isn’t always directly below the source of the leak. Water can travel along roof decking, rafters, or pipes before it finally drips down, making the true entry point tricky to find. If you see these signs, it’s important to act quickly. A persistent leak can lead to significant structural damage and mold growth, sometimes requiring an emergency roof repair to protect your home.
How to Pinpoint a Roof Leak
Finding the exact source of a roof leak can feel like a bit of detective work, but with a methodical approach, you can track it down. The key is to remember that where you see the water inside isn’t always where it’s getting in outside. Water can travel along rafters and decking before it finally drips down.
Start Your Search Inside
Your first clue is usually a water spot on your ceiling, but don’t be fooled—the actual entry point on your roof is almost always higher up. If you can safely access your attic, that’s the best place to start your investigation. Grab a flashlight and look for dark water stains on the underside of the roof deck or for damp insulation. Also, keep an eye out for “shiners”—nails that missed the framing joists. Moisture can condense on these cold nails and drip down, mimicking a leak.
Head Outside for a Closer Look
Once you have a general idea of the leak’s location from inside, it’s time to head outside for a visual inspection—but only if you can do so safely. Remember, the source of the leak is typically uphill from where the damage appears inside. Look for any obvious signs of trouble like missing, cracked, or curled shingles. Pay close attention to anything that penetrates the roof surface. Leaks are most common around vents, skylights, and chimneys, not in open areas of shingles. Check the seals and flashing around these features, as they are the most vulnerable spots on any residential roofing system.
Run a Simple Water Test
If a visual inspection doesn’t reveal the culprit, a controlled water test can help you zero in on the exact spot. You’ll need a helper for this. One person should go up on the roof with a garden hose (again, safety first!), while the other stays inside near the suspected leak area with a bucket and a cell phone. Start low on the roof, well below where you think the leak is, and soak a small section for several minutes. Have your helper inside watch for any drips. If nothing appears, move up the roof and repeat. This methodical approach helps you isolate the entry point. If this feels unsafe, it’s always best to call for professional emergency roof repair.
Key Areas to Check First
To make your search more efficient, concentrate on the usual suspects. First, inspect the flashing—the metal strips that seal joints around chimneys, dormers, and skylights. Look for gaps, rust, or bent sections. Next, check the rubber boots around plumbing vents and exhaust pipes. Over time, the sun can cause these to crack and deteriorate. Valleys, where two roof planes meet, are another critical area; check for debris buildup or damaged shingles that could trap water. A thorough hail damage inspection can also reveal hidden cracks or punctures in these vulnerable spots that are hard to see from the ground.
What to Do About an Active Leak
Finding a leak in your roof, especially during a classic Florida downpour, can feel overwhelming. But before you start worrying about the long-term fix, your immediate priority is damage control. Taking a few quick, decisive actions can prevent a small problem from turning into a major disaster. The goal is to stop the water from coming in and protect the inside of your home until a permanent repair can be made. Think of this as first aid for your roof—it’s about stabilizing the situation and preventing further harm.
Temporary Fixes to Stop the Water
If you can safely access your roof, the most effective temporary fix is to cover the damaged area with a waterproof tarp. Lay it flat over the suspected leak and extend it over the peak of the roof to keep water from running underneath. Use weights or roofing nails to hold it down securely. For smaller, more accessible holes or cracks, you can apply waterproof roofing tape or caulk to create a temporary seal. Inside, place a large bucket or even a small kiddie pool directly under the drip to catch the water and protect your floors. These measures won’t solve the underlying issue, but they are crucial for emergency roof repair and will buy you valuable time.
How to Limit Interior Damage
Once you’ve managed the immediate drip, turn your attention to protecting your home’s interior. Move any furniture, electronics, and valuables out of the affected area. If you have heavy furniture that can’t be moved, cover it with thick plastic sheeting. It’s important to remember that the water spot on your ceiling might not be directly below the actual leak in the roof; water can travel along rafters before it drips down. Ignoring even a small leak can lead to serious issues like mold, mildew, and rotting wood frames, which is why a professional hail damage inspection is so important after a storm to catch these problems early.
Safety First: Important Precautions
Getting on your roof is risky, and your safety should always come first. If you decide to attempt a temporary fix yourself, wear the right gear: non-slip shoes are a must, along with long pants, thick gloves, and safety goggles. Never work on a wet or steep roof, and avoid going up during a storm or in high winds. It’s also a good rule of thumb to never work alone; always have someone on the ground to help and call for assistance if needed. Roof work is inherently dangerous, so if you feel unsure or uncomfortable at any point, it’s best to leave the residential roofing work to qualified professionals.
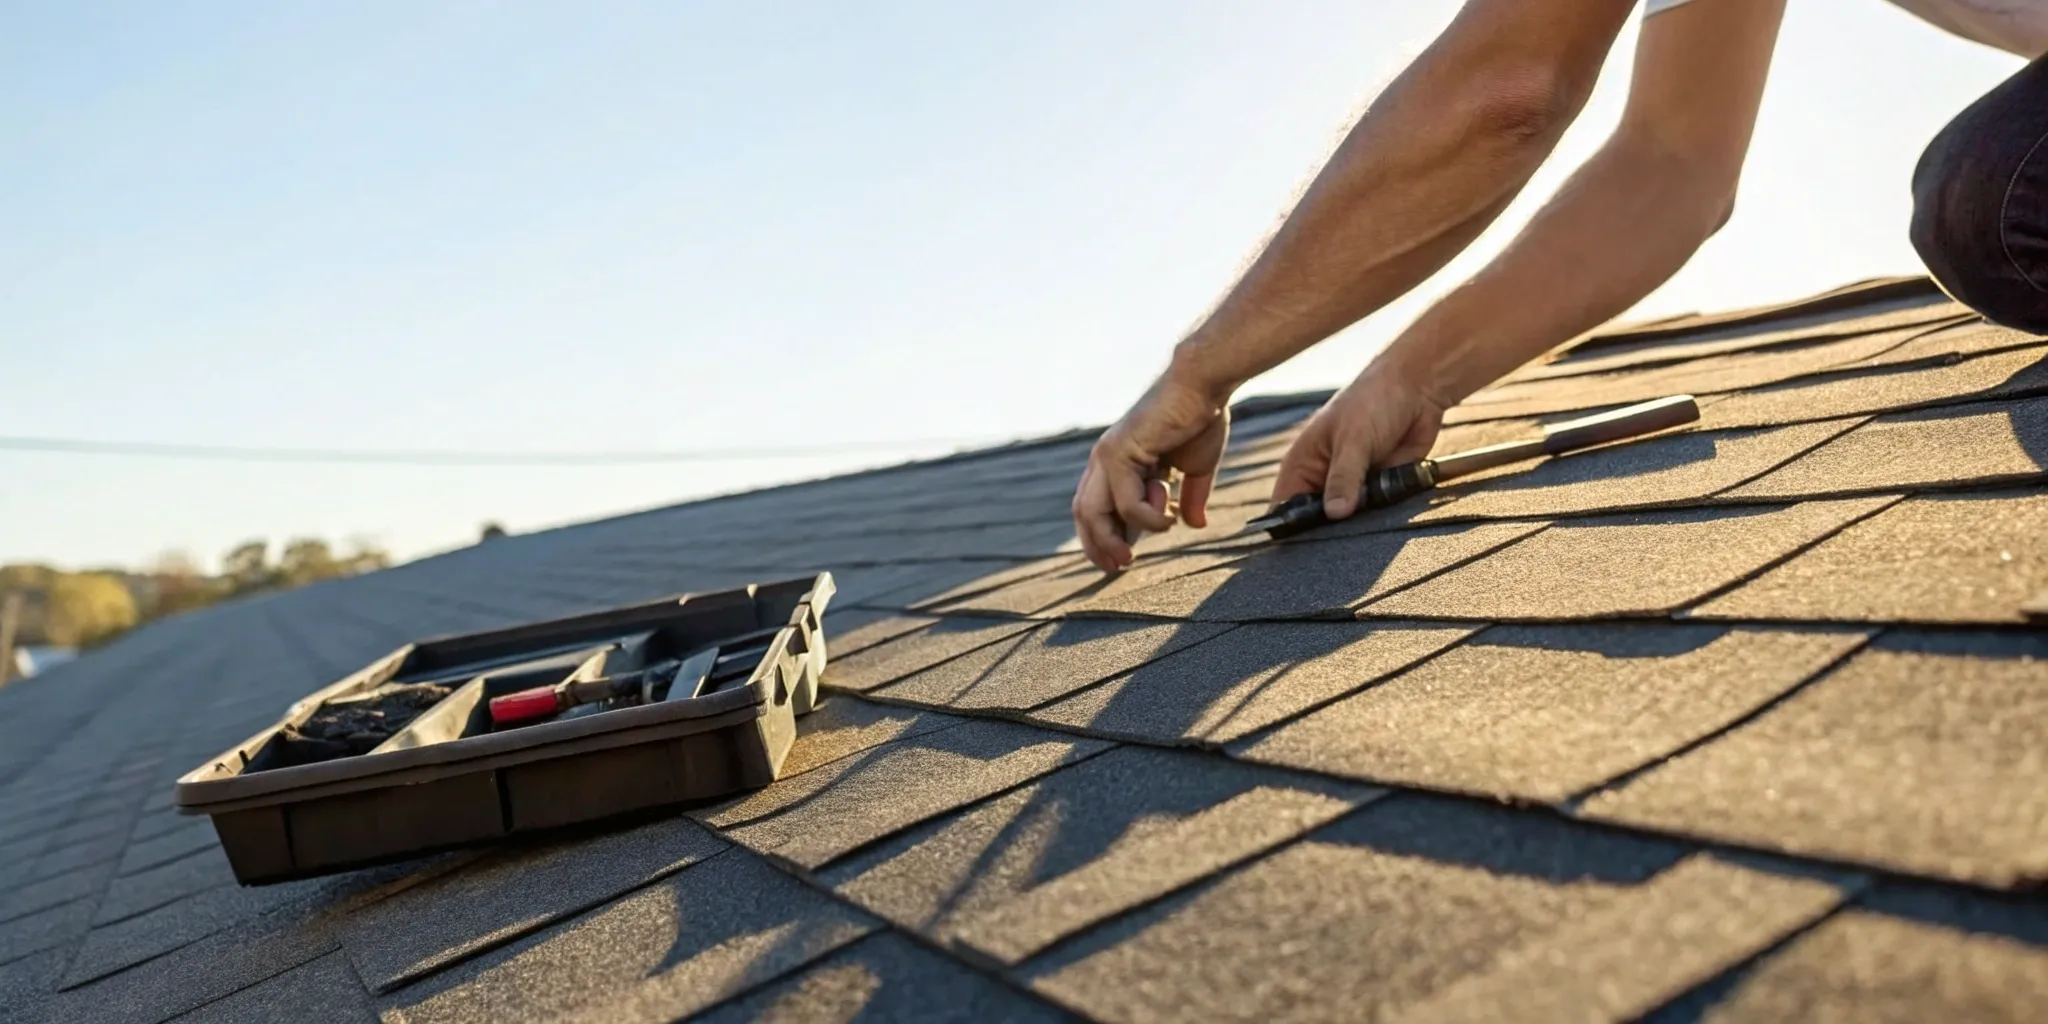
Gather Your Tools and Materials
Before you even think about stepping onto a ladder, let’s talk about preparation. Having everything you need within arm’s reach not only makes the job go faster but also keeps you safer. Think of it as your pre-flight checklist. Taking a few minutes to gather your tools and materials will save you from making multiple trips up and down the ladder, which is where most accidents happen. A well-prepped workspace is the first step toward a successful and safe repair.
Essential Safety Gear
This is the most important step, and it’s not one you can skip. Working on a roof is serious business, and your safety should always be the top priority. Start with the basics: wear long sleeves and long pants to protect your skin, and put on a pair of sturdy, non-slip shoes with good grip. Safety goggles and thick gloves are also must-haves to protect your eyes and hands from debris and sharp materials. For any roof with a noticeable slope, a roofing harness is essential. It might feel like overkill, but it’s the single best piece of equipment to prevent a serious fall.
Your Repair Toolkit
Having the right tools for the job can be the difference between a frustrating afternoon and a smooth, efficient repair. Your basic toolkit should include a sturdy ladder, a hammer, a flat pry bar for lifting shingles, a utility knife for cutting materials, and a caulk gun. A tape measure and chalk line will help you keep everything straight and professional-looking. If you’re planning to replace a larger section of shingles, you might consider renting a pneumatic nail gun. It’s a bit of an investment, but it will save you a significant amount of time and effort compared to hammering every nail by hand.
Necessary Roofing Materials
Now for the materials that will actually fix the leak. The specific products you need will depend on the type of repair, but a few items are always good to have. For sealing cracks and securing flashing, a rubberized roofing cement or patch is your best friend. You can find it in large gallon buckets for bigger jobs or in a simple caulking tube for smaller fixes. You’ll also need roofing adhesive and caulk to ensure every part of your repair is completely watertight. For tiny holes, waterproof roofing tape can provide a quick seal, which is helpful if you need to stop water immediately before a professional can arrive for an emergency roof repair.
Your Step-by-Step Repair Guide
Once you’ve pinpointed the leak and gathered your supplies, it’s time to get to work. This guide breaks down the repair process into four manageable steps. Remember to always prioritize your safety—if you ever feel unsure or the damage looks extensive, it’s best to pause and call in a professional. For smaller, more straightforward fixes, following these steps carefully can help you restore your roof’s integrity and protect your home from further water damage. Let’s walk through how to get it done right.
Prep the Repair Area
Before you can fix anything, you need a clean and clear workspace. Start by sweeping away any leaves, dirt, or debris from the damaged section of the roof. This gives you a clear view of the problem area and ensures your new materials will adhere properly. When you see a leak inside your home, a great tip is to look at the roof area directly above it and then work your way uphill. Water can travel under shingles before it finds a way inside, so the entry point on the roof is often higher than where the stain appears on your ceiling.
Remove Damaged Materials
With the area prepped, you can now remove the compromised materials. For a damaged shingle, you’ll need to carefully loosen or pry it up, along with the ones directly surrounding it, using a flat bar or putty knife. This gives you access to the nails and the underlayment. Take a close look at the nails; sometimes, a nail that wasn’t driven in flat can cause a shingle to tear over time as it heats and cools. If you find the damage is more widespread than you thought, it might be time to consider an emergency roof repair service to prevent further issues.
Apply the Permanent Fix
Now it’s time to seal the leak. The method here depends on the source of the problem. If you’re dealing with flashing around a chimney or vent pipe, apply a generous bead of roofing cement or sealant to any visible gaps or cracks. For smaller holes or worn spots on the shingles themselves, you can use a putty knife to spread a patch of roofing cement over the entire area. Make sure you cover any cracks, nail holes, and worn sections completely to create a durable, waterproof barrier against future rain.
Install the New Materials
The final step is putting everything back together. If you removed a shingle, carefully slide the new one into place. It’s crucial to ensure it aligns perfectly with the surrounding shingles to create a tight, seamless seal. Once it’s positioned correctly, secure it with roofing nails in the proper locations, making sure not to nail through the sealant strip on the shingle below. Finally, press the shingle down firmly so it seals to the course below it. This last press helps the adhesive bond and completes your residential roofing repair.
How to Tackle Specific Leaks
Once you’ve found the source of the leak, the repair method depends on its location. Different parts of your roof require unique solutions. From a single cracked shingle to a failing seal around a vent pipe, knowing the right approach is key to a lasting fix. Here’s how to handle some of the most common roof leaks.
Repairing Damaged Shingles
Cracked or missing shingles are a frequent cause of leaks, especially after a storm brings high winds or hail damage. To replace one, use a flat pry bar to gently loosen the shingle above it. Remove the nails from the damaged shingle, slide it out, and slip the new one into place. Secure it with roofing nails, then apply roofing sealant to the nail heads and shingle tabs to create a watertight seal.
Fixing Flashing and Valley Leaks
Flashing is the metal material installed around roof joints—like where the roof meets a wall—and in valleys where two roof planes meet. These areas are prime spots for leaks. If you find a gap, clean the area and apply a new bead of roofing cement. For small holes in the flashing, use a metal patch sealed with urethane sealant and secured with screws. Be sure to caulk around all the edges for a complete fix.
Sealing Vents and Chimneys
Anything that penetrates your roof, like vents or a chimney, creates a potential entry point for water. Inspect the rubber boot at the base of your vent pipes for cracks caused by sun exposure; if you see damage, replace the entire boot. For chimneys, check for cracks in the flashing or mortar. Small gaps can be filled with roofing cement, but significant damage might mean it’s time to call for professional help.
Solving Skylight Leaks
Skylights are a common source of leaks, which typically occur along the top edge or in the corners. Start by clearing away any leaves or debris that might be trapping water. Check for cracked seals around the glass and inspect the metal flashing for gaps. Often, a simple fix is applying a new layer of clear silicone caulk around the lens. If the flashing is bent or pulled away, it may need to be reshaped and resealed with roofing cement.
When to Call a Professional
While tackling a small repair yourself can feel empowering, it’s crucial to know when a leak is beyond a DIY fix. Roofing work is inherently dangerous, and a small mistake can lead to bigger, more expensive problems or even serious injury. Recognizing your limits is the smartest move you can make as a homeowner. If you find yourself hesitating or feeling unsure at any point, that’s your cue to step back and call in a professional. A trusted roofer has the experience, tools, and safety equipment to handle the job correctly and efficiently, giving you peace of mind that your home is protected.
Signs the Job Is Too Big for DIY
It’s tempting to try and fix things yourself, but some situations absolutely require a professional. If you notice any of these signs, it’s time to put down the tools and pick up the phone. Call a roofer if the damage is widespread, like after a major storm, as you may need a thorough hail damage inspection to assess the full extent of the problem. You should also call a pro if the leak is extensive, has been going on for a while, or if your roof is old and nearing the end of its lifespan. Any major structural repairs are firmly in the professional-only category. Ultimately, if you feel uncomfortable on the roof or are simply unsure how to proceed, that’s the clearest sign to call for help.
How to Choose a Trusted Contractor
Hiring a professional roofer does more than just fix a leak; it protects your investment. A pro can prevent costly mistakes that might void your roof’s warranty or lead to even bigger issues down the road. They have the right safety gear and experience to complete the job without anyone getting hurt. When looking for a contractor for your residential roofing needs, start by checking for proper licensing and insurance. Look for a company with a strong local reputation, positive online reviews, and a portfolio of completed projects. A trustworthy contractor will offer a detailed, written estimate and be happy to answer all of your questions before any work begins.
What to Expect for Repair Costs
If you have an active leak, the first step is often getting a tarp on the roof to prevent further water damage inside your home. This is a common temporary fix that a professional can handle quickly. You can expect this service to cost between $300 and $500, and the good news is that your homeowner’s insurance may cover it. This is an essential part of any emergency roof repair and buys you time to figure out a permanent solution. From there, a professional will assess the damage and provide a detailed quote for the full repair. If the damage is storm-related, a good roofer can also provide roof claim assistance to help you work with your insurance company.
How to Prevent Future Leaks
After you’ve fixed a leak, the last thing you want is a repeat performance. The best way to handle roof leaks is to stop them before they start. A little proactive care goes a long way in protecting your home and avoiding costly repairs down the road. By staying on top of a few simple tasks, you can keep your roof in great shape and catch small issues before they turn into major headaches. Think of it as routine health care for your home’s most important shield against the elements.
Perform Regular Inspections
Set a calendar reminder to inspect your roof at least once a year, and always after a major storm. For those of us in Central Florida, checking it before the rainy season is a smart move. You don’t have to be a roofing expert to spot potential trouble. From the ground, use a pair of binoculars to look for shingles that are cracked, curling, or missing altogether. Pay close attention to the seals around vents and chimneys. If you notice significant granule loss or signs of storm damage, it might be time for a professional look. A thorough hail damage inspection can identify problems that are hard to see from the ground.
Follow a Simple Maintenance Schedule
A straightforward maintenance routine can save you a lot of trouble. Start by keeping your gutters clean. When gutters get clogged with leaves and debris, water can back up and seep under the edge of your roof. At least twice a year, clear them out so water can flow freely. While you’re at it, trim back any overhanging tree branches that could scrape against your roof or fall during a storm. You should also regularly check your flashing—the thin metal strips around chimneys, vents, and skylights—as it’s a common spot for leaks. If you’re not comfortable on a ladder, a professional residential roofing service can handle this maintenance for you.
Watch for Early Warning Signs
Your house will often give you clues that a leak is forming. Inside, look for water spots or discoloration on your ceilings and walls, especially after it rains. Peeling paint near the roofline or a musty smell in your attic are also red flags. Many leaks happen at “penetrations,” which are simply places where something like a pipe, vent, or chimney goes through the roof. These spots are vulnerable, so keep an eye on the areas around them. Catching these signs early can mean the difference between a simple fix and a major problem. If you spot a sudden drip, don’t wait for it to get worse; it may require an emergency roof repair.
Related Articles
- Temporary Patch Roof Leak Repair Until Professional Help Arrives
- 5 Roof Leak Solutions: Secure Your Roof with Expert Insight – Skylight Roofing Inc.
- Looking Out For Storm Damage – Skylight Roofing Inc.
- 5 Critical Signs You Need Roof Repair in The Villages, FL – Act Now! – Skylight Roofing Inc.
- The Ultimate Guide to Residential Roofing Services: Protecting Your Home from Top to Bottom – Skylight Roofing Inc.
Frequently Asked Questions
My ceiling stain is small. Can I just wait and see if it gets worse? It’s tempting to ignore a small spot, but I’d strongly advise against it. That visible stain is often just the final symptom of a bigger problem. By the time water shows up on your ceiling, it has already soaked through your roof decking, insulation, and drywall. Waiting allows moisture to spread, which can lead to wood rot, damaged insulation, and even mold growth in your attic. It’s always better to address a leak right away, no matter how minor it seems.
Why is the leak showing up far from my chimney or vent? This is a common and frustrating part of leak detection. Water rarely drips straight down. Once it gets under your shingles, it will follow the path of least resistance, often running along a rafter, pipe, or the underside of the roof decking until it finds a seam or low point to drip through. This is why the source of the leak on your roof is almost always higher up than where you see the water spot inside.
Is it safe for me to walk on my roof to find a leak? Your safety should always be your top priority. If your roof has a steep pitch, is wet from rain, or you simply don’t feel comfortable with heights, it’s best to stay on the ground. Even for experienced DIY-ers, a simple slip can have serious consequences. A professional has the right safety equipment and training to move around a roof safely, so if you have any doubt at all, it’s always the smarter choice to call for help.
I’ve tried looking for the leak but can’t find the source. What now? Don’t feel discouraged; some leaks are incredibly tricky to find. If you’ve done a thorough visual check from both inside and outside and still can’t pinpoint the entry point, it’s time to call a professional. Roofers have years of experience and know exactly what to look for. They can often spot subtle signs of damage you might miss and can find the source much faster, preventing further damage to your home.
How can I tell if I need a simple repair or a full roof replacement? A single leak doesn’t automatically mean you need a whole new roof. If your roof is relatively new and the damage is isolated to one small area, a professional repair is usually all that’s needed. However, if your roof is over 15-20 years old, you’re seeing multiple leaks in different spots, or you notice widespread issues like curling or balding shingles, a replacement might be the more sensible and cost-effective solution in the long run.